How It Works

Cigati Microsoft 365 Tenant to Tenant Migration Tool

Seamlessly migrate Mailbox, SharePoint, and OneDrive data across Microsoft 365 tenants with an advanced tool designed for secure, accurate, and reliable transfers. The tool features built-in deduplication for Emails, SharePoint, and OneDrive, scanning source data to identify and remove duplicate items before migration - minimizing unnecessary data transfer and improving overall storage efficiency.

strip-img

Microsoft 365 Tenant to Tenant Migration Tool

4.7

Download Purchase

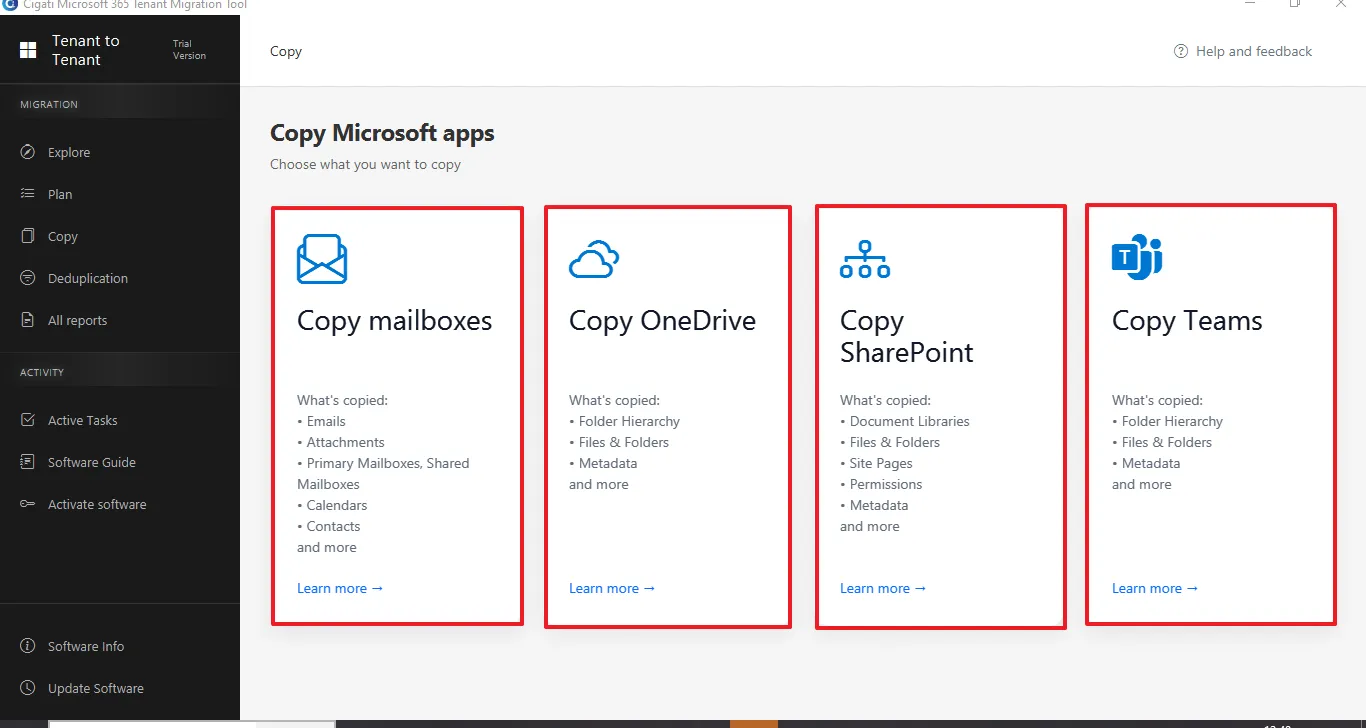
Choose the Copy Mailboxes, SharePoint, OneDrive, & Teams option to export Microsoft data.
step

Step-1

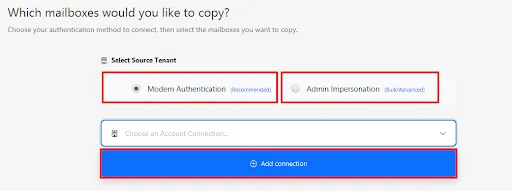
Add a Source Tenant Connection

Choose the source tenant login option: Modern Authentication or Admin Impersonation. Click Add Connection and enter your Microsoft 365 administrator email address to register the source tenant.
step

Step-2

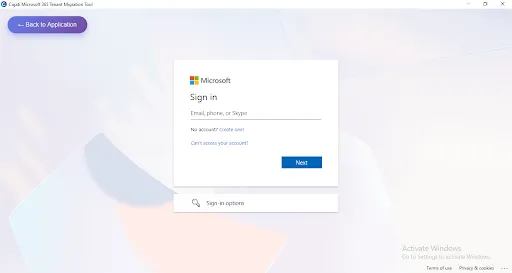
Authenticate for Modern Authentication

Enter the administrator email and password and complete the Microsoft sign-in process to establish a secure connection. Review and accept the Microsoft Graph API permissions required to access mailbox data for migration.
step

Step-3

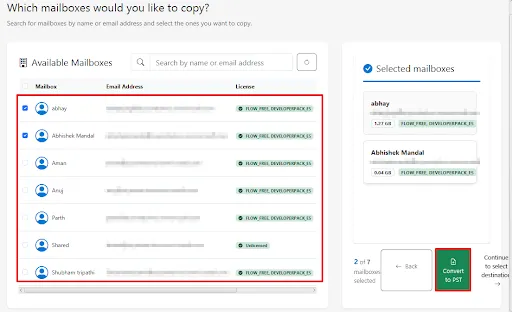
Verify the Connected Tenant

After authentication, the software loads all available mailboxes along with user details, mailbox size, and license information. Click on Convert to PST.
step

Step-4

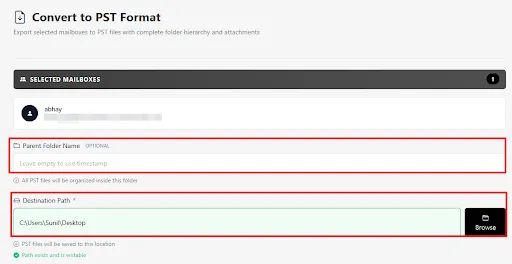
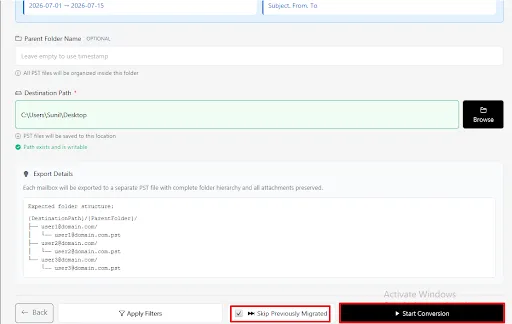
Enter a Parent Folder Name

Optionally specify a parent folder name to organize all exported PST files under a single directory. Browse and choose the local folder where the exported PST files will be saved.
step

Step-5

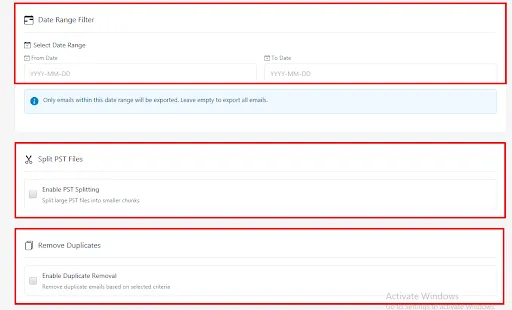
Apply a Filter (Optional)

Specify a From and To date to export only emails within the selected time period. Split large PST files into smaller parts and remove duplicate emails to maintain an organized mailbox.
step

Step-6

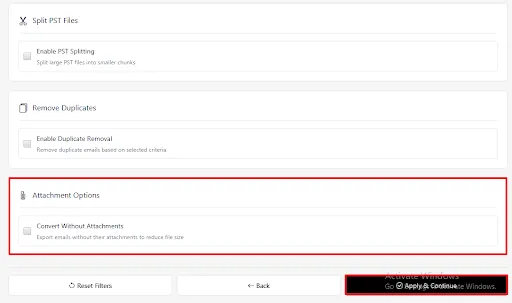
Apply the Selected Filters

Click Apply and Continue to save the configured filters and export settings.
step

Step-7

Start the PST Export

Click Start Conversion to begin exporting the selected Microsoft 365 mailboxes while preserving folder hierarchy, attachments, and metadata.
step

Step-8

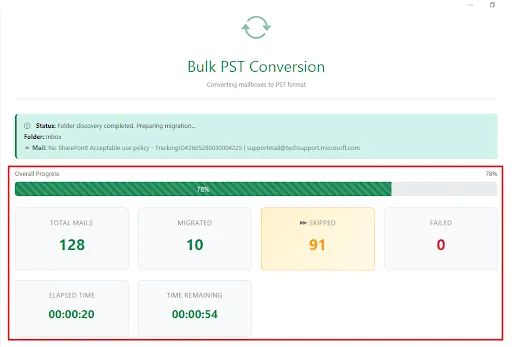
Review the Export Summary

After completion, verify the migration report showing processed mailboxes, exported items, failures (if any), and open the destination folder to access the generated PST files.
step

Step-1

Connect to the Source Tenant

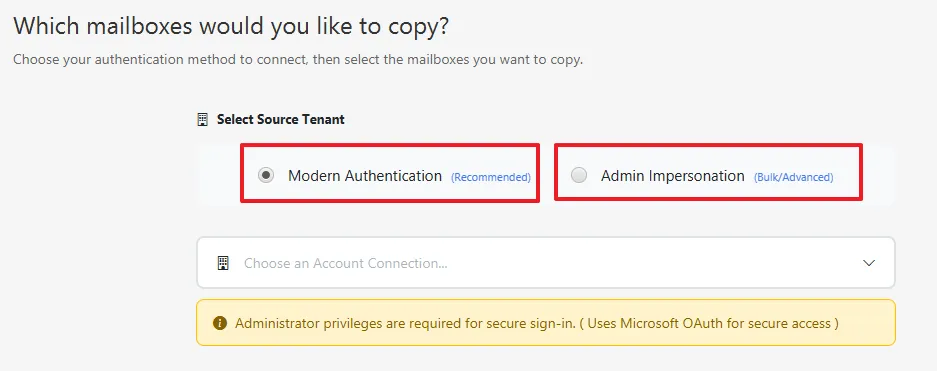
Choose your authentication method under Select Source Tenant — Modern Authentication (Recommended) or Admin Impersonation (Bulk/Advanced) — then select the required account connection and sign in with administrator privileges.

Important: Administrator privileges are required for secure sign-in, and Microsoft OAuth is used for secure access.
step

Step-2

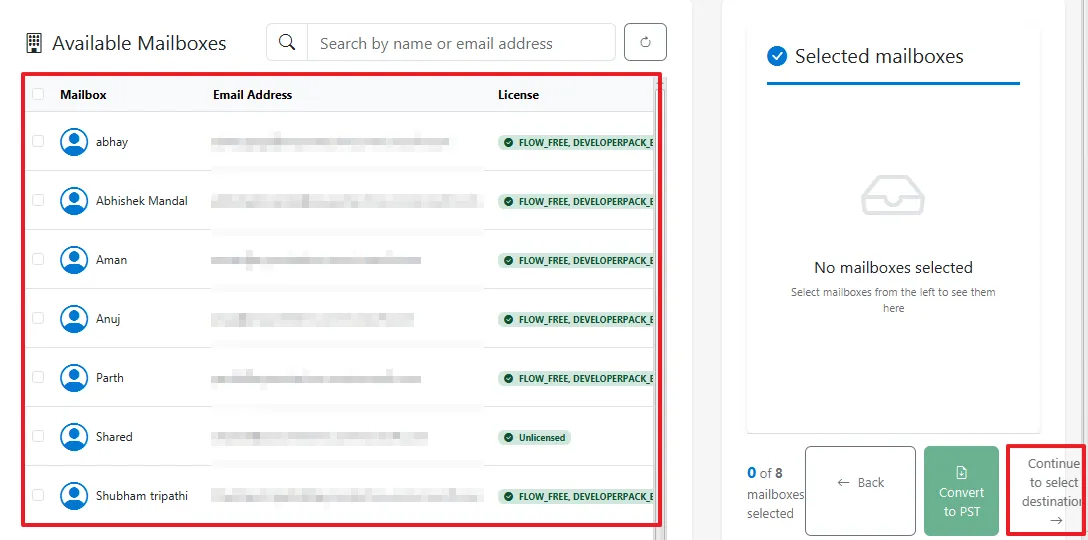
Select the Mailboxes to Copy

Use the search box to find mailboxes by name or email address, then select the checkbox beside the mailbox(es) you want to copy. Review your selection in the Selected Mailboxes panel, and click Continue to Select Destination.
step

Step-3

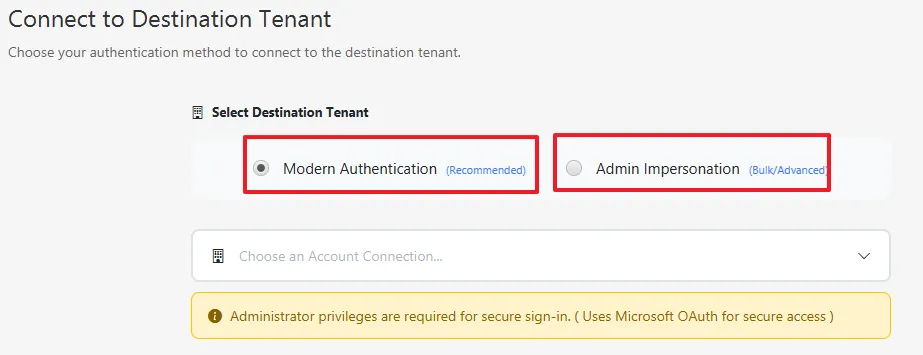
Connect to the Destination Tenant

On the Connect to Destination Tenant screen, choose your authentication method — Modern Authentication (Recommended) or Admin Impersonation (Bulk/Advanced) — then select the required destination account connection and sign in with administrator privileges.
step

Step-4

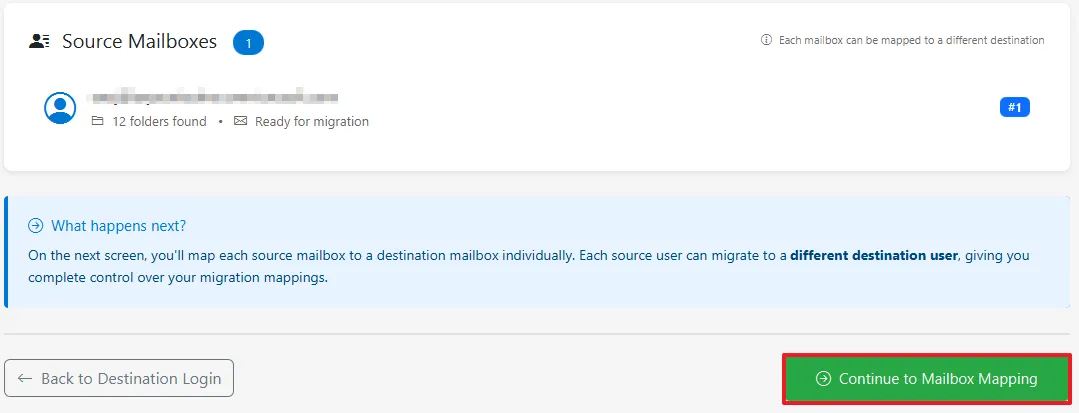
Review Selected Source Users

Review the source mailboxes queued for migration, including the number of folders found and their readiness status. Read the "What happens next" note, which explains that each source mailbox can be mapped to a different destination user, then click Continue to Mailbox Mapping.
step

Step-5

Map Source to Destination Mailboxes

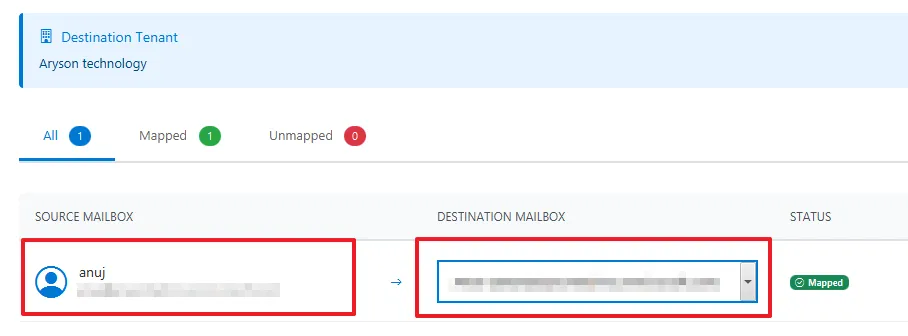
On the Mailbox Mapping screen, review the connected Destination Tenant, then map each source mailbox to the correct destination mailbox using the dropdown. Use the All, Mapped, and Unmapped tabs to track mapping progress, and confirm the Status shows Mapped for each entry.
step

Step-6

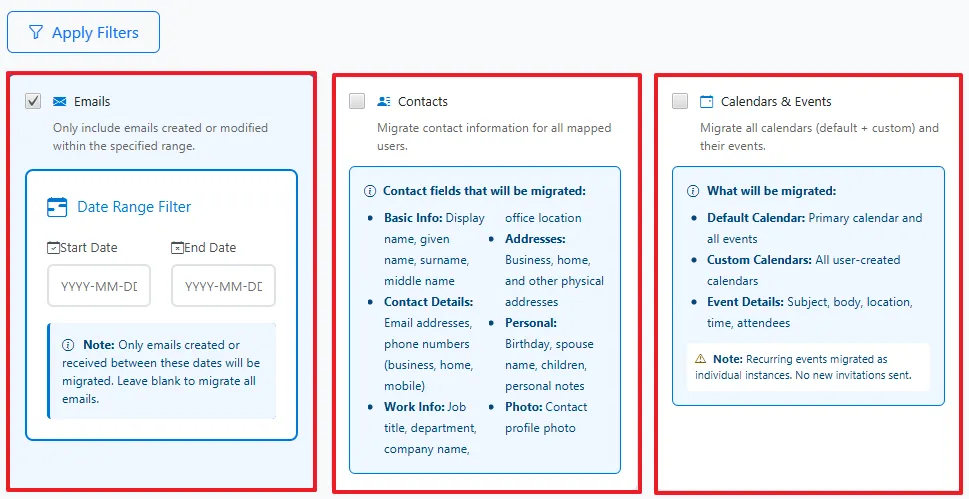
Choose What to Include in the Copy

  • Emails: apply a Date Range Filter (Start Date/End Date) to migrate only emails created or received within a specific period, or leave blank to migrate all emails.
  • Contacts: migrates contact details including basic info, addresses, work info, and personal fields for all mapped users.
  • Calendars & Events: migrates default and custom calendars along with event details such as subject, body, location, time, and attendees.

Note: Recurring events are migrated as individual instances, and no new invitations are sent.
step

Step-7

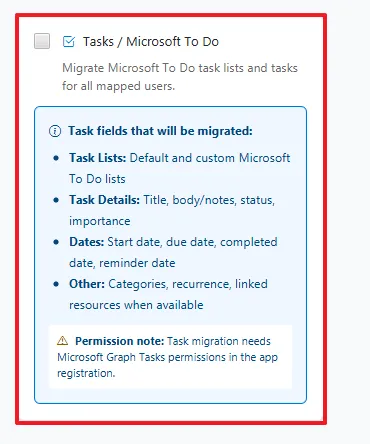
Include Tasks (Optional)

Enable Tasks / Microsoft To Do if you want to migrate task lists and tasks for all mapped users, including task details, dates, categories, and recurrence.

Permission note: Task migration requires Microsoft Graph Tasks permissions in the app registration.
step

Step-8

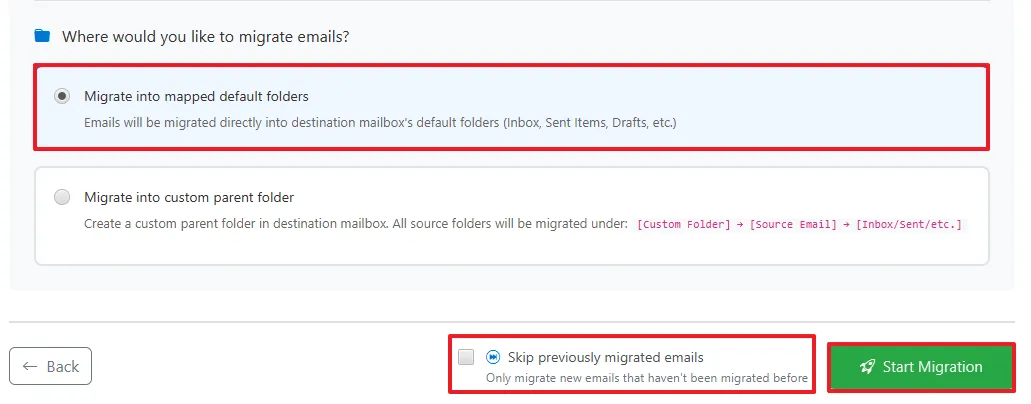
Choose Where Emails Will Be Migrated

  • Migrate into mapped default folders: emails go directly into the destination mailbox's default folders (Inbox, Sent Items, Drafts, etc.).
  • Migrate into custom parent folder: creates a custom parent folder in the destination mailbox, with all source folders migrated under it.

Optionally enable Skip Previously Migrated Emails to migrate only new emails that haven't been transferred before, then click Start Migration to begin the copy process.
step

Step-1

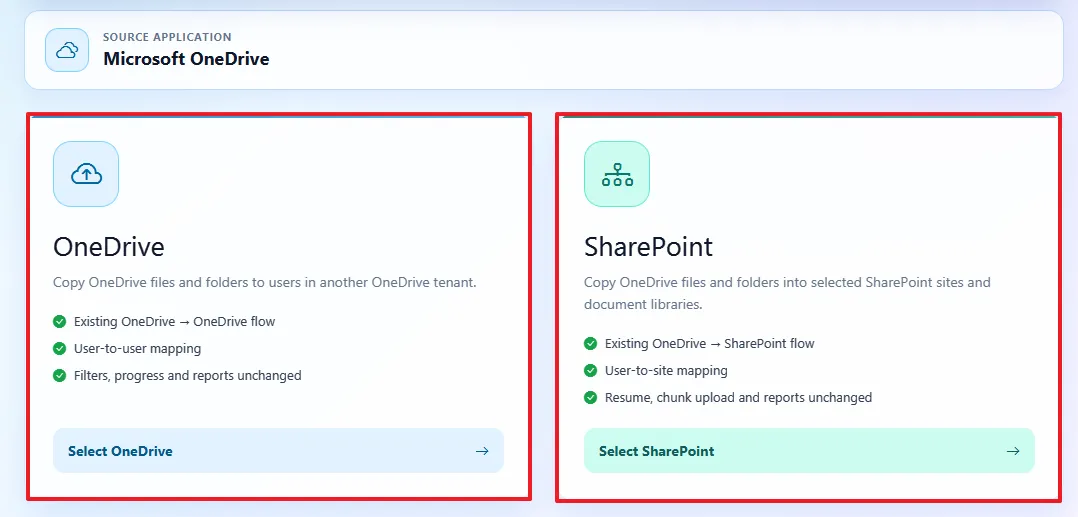
Select OneDrive Migration

The tool provides two destination options:

  • OneDrive → OneDrive: Move files and folders between OneDrive accounts in different tenants.
  • OneDrive → SharePoint: Move OneDrive data into selected SharePoint sites or document libraries.

For a tenant-to-tenant OneDrive migration, select OneDrive.
step

Step-2

Connect to the Source OneDrive

On the Connect to Source OneDrive Account screen:
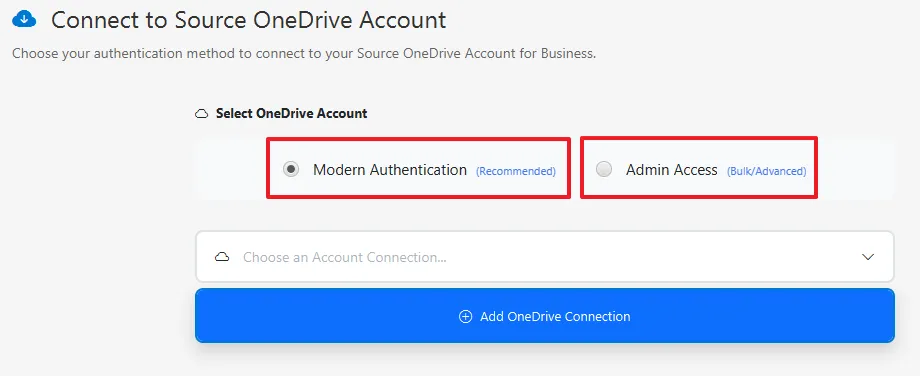
  1. Select the authentication method:
    • Modern Authentication – recommended
    • Admin Access – intended for bulk/advanced migrations.
  2. Select an existing account connection, or click Add OneDrive Connection.
  3. Authenticate the source Microsoft 365 account.
step

Step-3

Select Source OneDrive Users

After connecting, the tool displays the available OneDrive users.

You can:
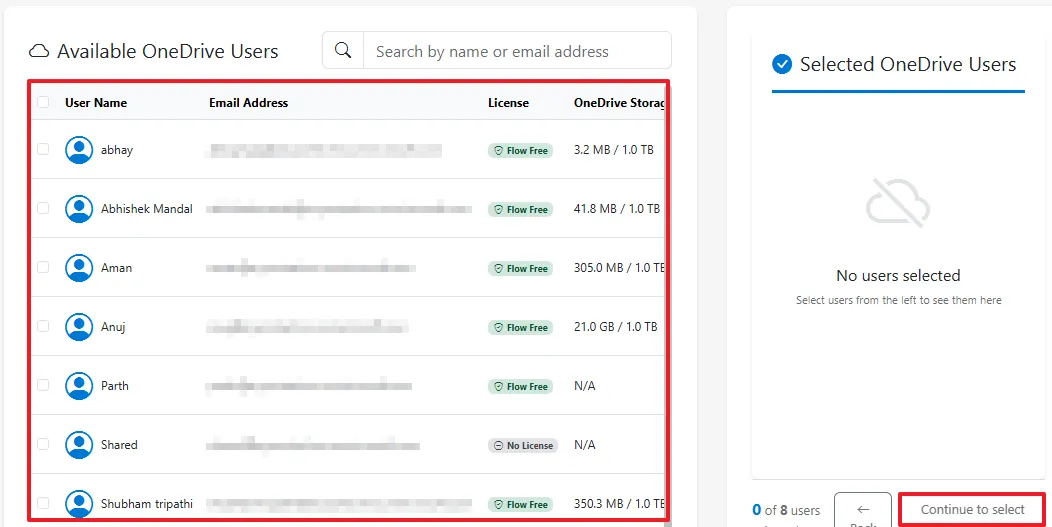
  • Search users by name or email address.
  • Select individual OneDrive accounts.
  • Review the user's license and OneDrive storage information.
  • Continue after selecting the users you want to migrate.
step

Step-4

Connect to the Destination OneDrive

Next, connect to the destination Microsoft 365 tenant.
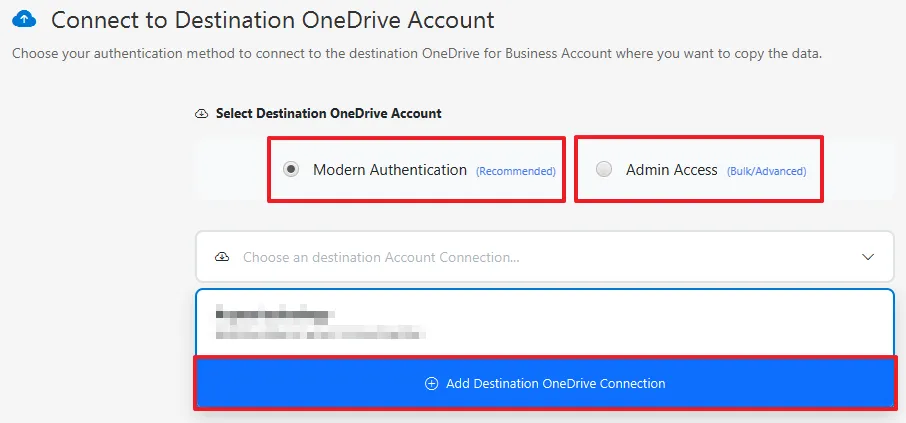
  1. Choose Modern Authentication or Admin Access.
  2. Select an existing destination connection.
  3. If required, click Add Destination OneDrive Connection.
  4. Authenticate the destination account.
step

Step-5

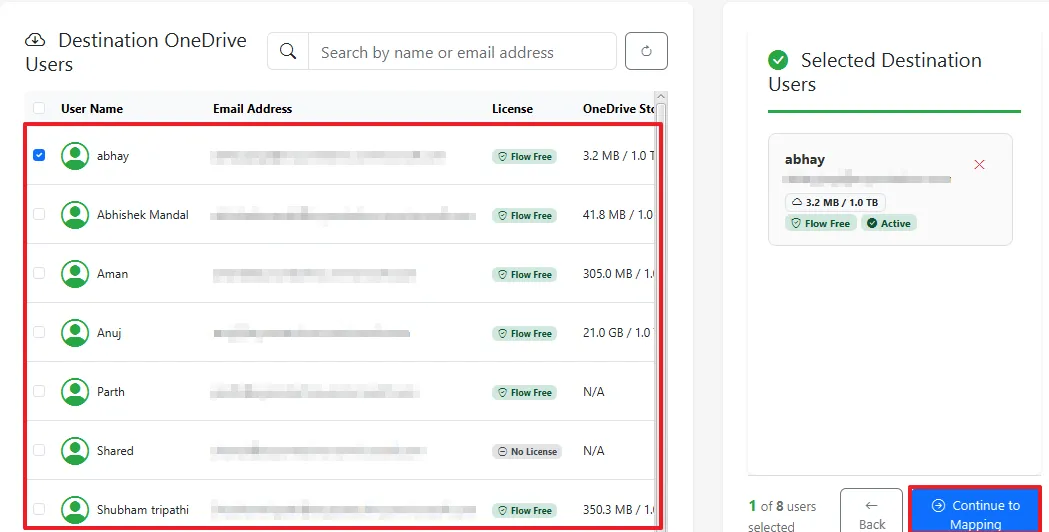
Select Destination OneDrive Users

The tool then displays the destination OneDrive accounts.

Select the destination user(s) that will receive the migrated data. The selected users appear in the Selected Destination Users panel. Click Continue to Mapping.
step

Step-6

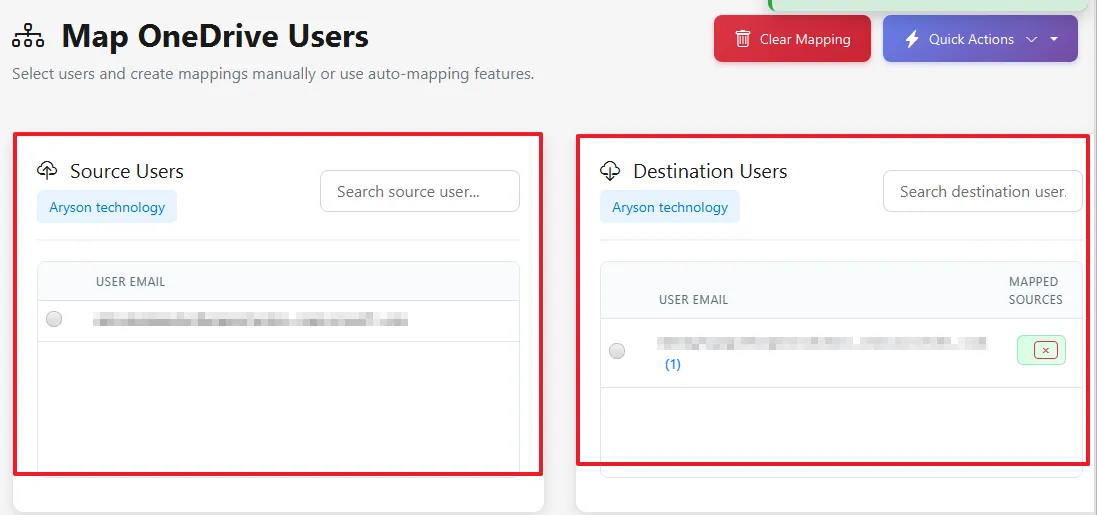
Map Source Users to Destination Users

The Map OneDrive Users screen lets you create source-to-destination mappings.

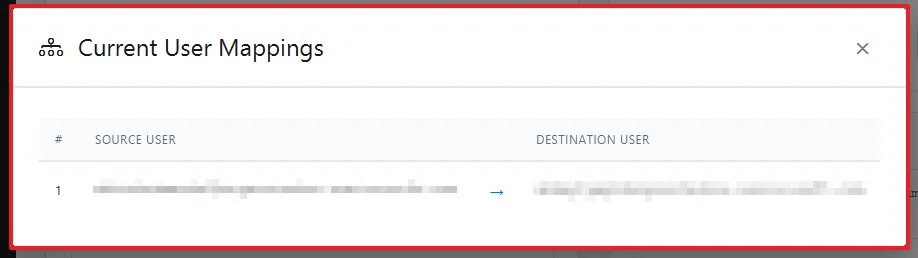
For example: Source User → Destination User
step

You can:

  • Search source users.
  • Search destination users.
  • Create mappings manually.
  • Use available auto-mapping/quick-action options.
  • Click View Mapping to verify the mappings.

Once the mappings are correct, click Next.
step

Step-7

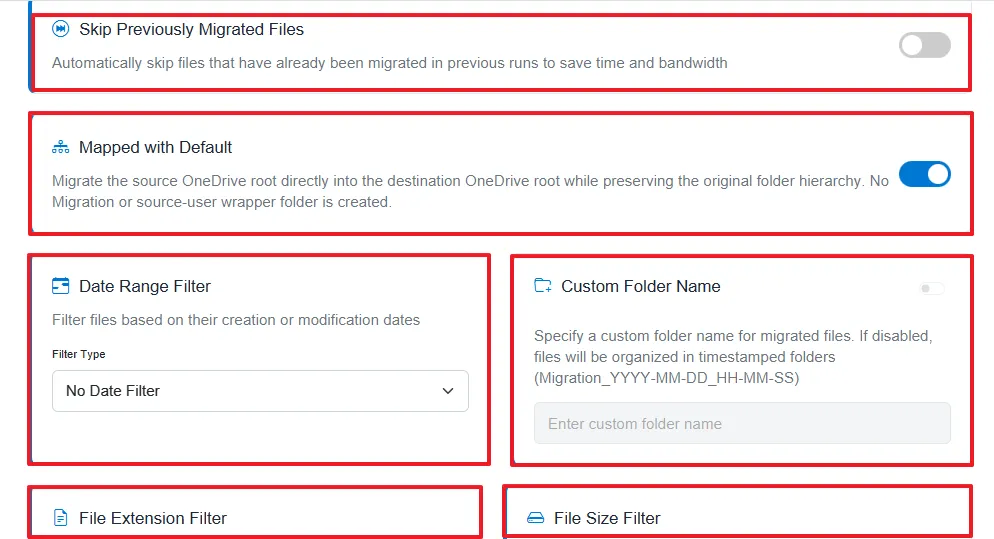
Configure Migration Filters

The Filters screen allows you to control which OneDrive files are migrated.

  • Skip Previously Migrated Files – avoids migrating files that were already copied during an earlier run.
  • Mapped with Default – copies the source OneDrive root directly into the destination OneDrive root while preserving the folder hierarchy.
  • Date Range Filter – migrates files based on their creation or modification date.
  • Custom Folder Name – place migrated content inside a specified folder.
  • File Extension Filter – control migration based on file types.
  • File Size Filter – control which files are migrated based on their size.

Configure the required filters according to your migration requirements.
step

Step-8

Start the Migration

After configuring the filters, click Start Migration. The tool then begins copying the selected OneDrive data from the mapped source users to their corresponding destination users.

step

Step-1

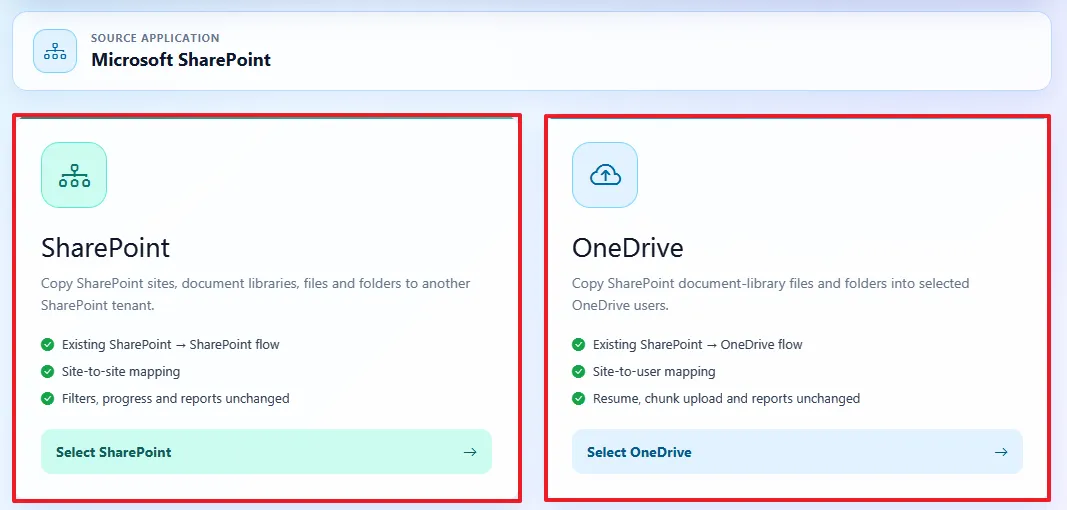
Select SharePoint Migration

From the Copy Microsoft apps section, select Copy SharePoint.

This option is designed to transfer SharePoint content between Microsoft 365 environments.

You can use it to move: Document libraries, Files and folders, SharePoint site content, Pages, Permissions, Metadata, and other supported data.

For a SharePoint-to-SharePoint migration, select Copy SharePoint.
step

Step-2

Connect to the Source SharePoint

On the Connect to Source SharePoint Account screen:
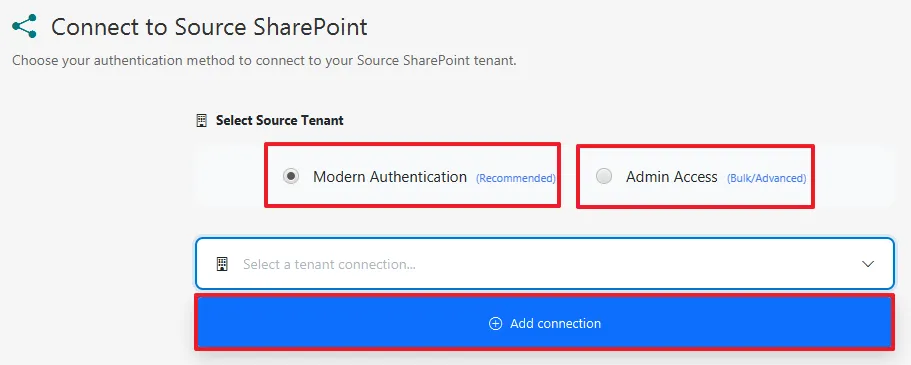
  1. Select the available authentication method:
    • Modern Authentication – recommended for secure access.
    • Admin Access – useful for bulk or advanced migrations.
  2. Select an existing SharePoint connection or click Add SharePoint Connection.
  3. Sign in and authorize access to the source Microsoft 365 tenant.
step

Step-3

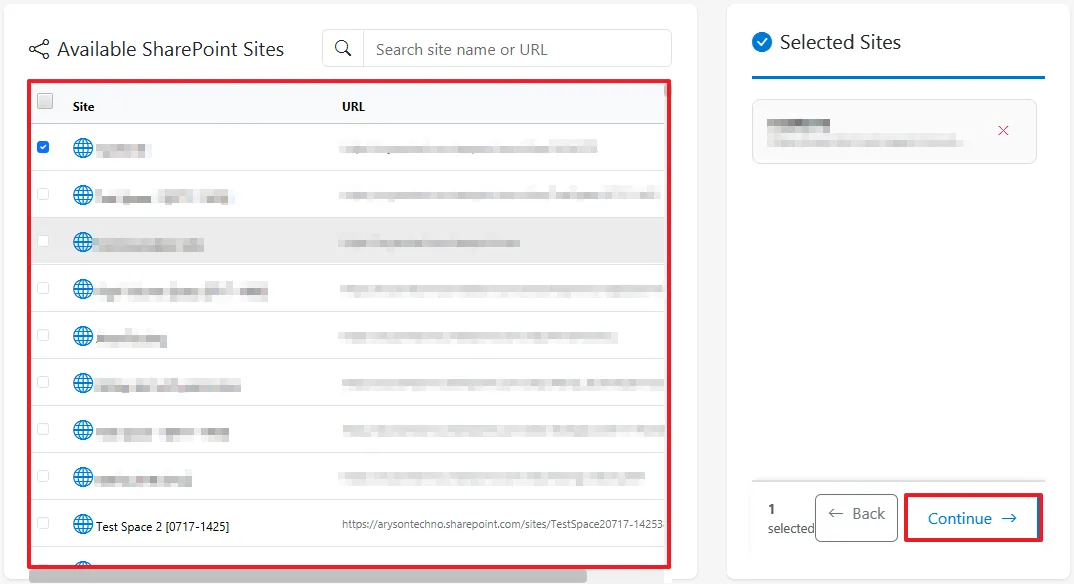
Select the Source SharePoint Sites

After authentication, the tool loads the available SharePoint sites.

You can:

  • Search for sites by name.
  • Select the SharePoint sites you want to migrate.
  • Review the available site and document library information.
  • Choose the required sites and continue to the destination setup.

Select only the sites that need to be transferred to the destination environment.
step

Step-4

Connect to the Destination SharePoint

Next, establish a connection with the SharePoint environment where the content will be migrated.
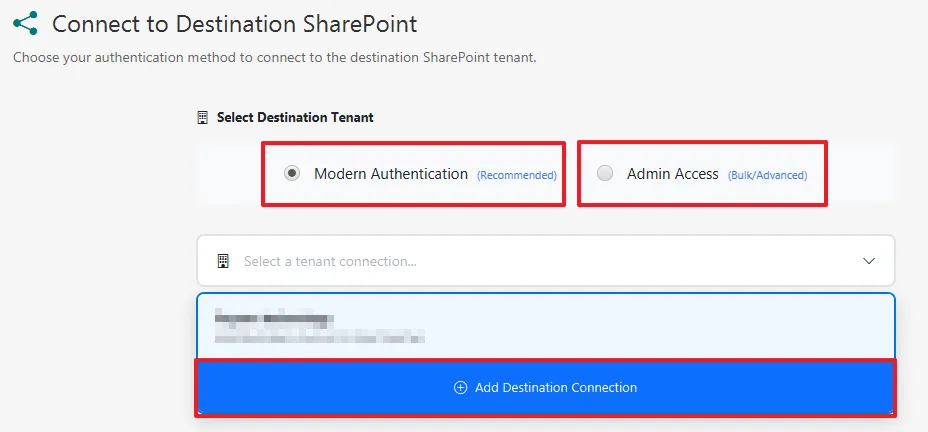
  1. Select Modern Authentication or Admin Access.
  2. Choose an existing destination SharePoint connection.
  3. If no connection is available, click Add Destination SharePoint Connection.
  4. Sign in and authorize the required SharePoint access.
step

Step-5

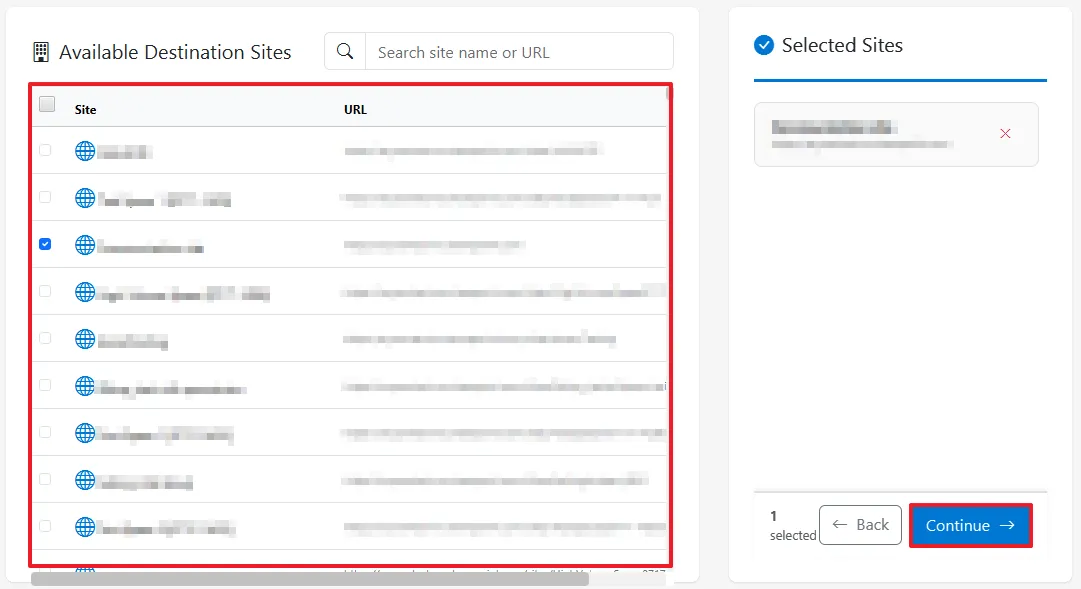
Select Destination SharePoint Sites

After connecting to the destination tenant, the available SharePoint sites are displayed. Select the destination sites and document libraries where the source content should be copied.

For example: Source SharePoint Site → Destination SharePoint Site
step

Step-6

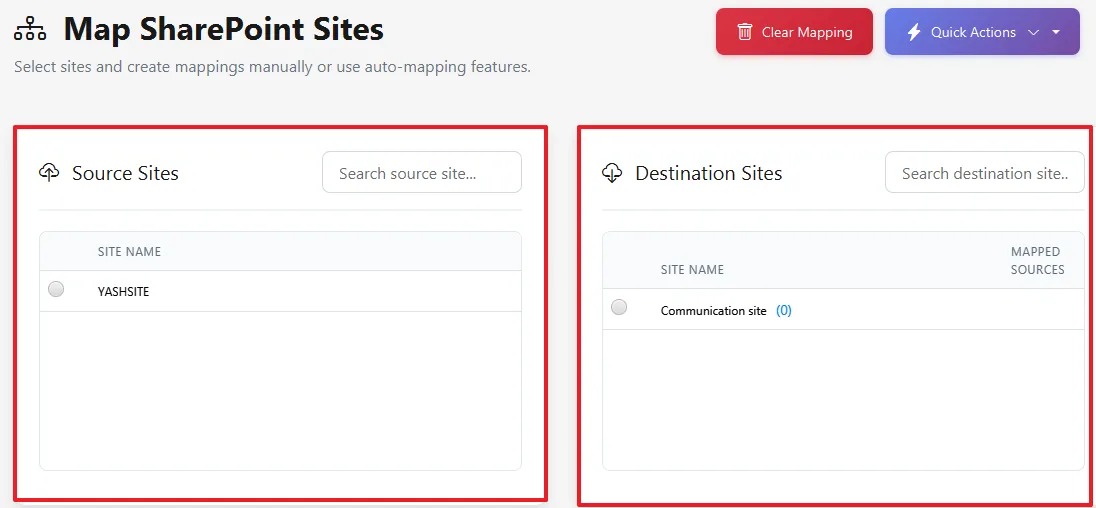
Map Source Sites to Destination Sites

Use the mapping screen to associate each source SharePoint site with its corresponding destination site.

You can:

  • Search for source sites.
  • Search for destination sites.
  • Create mappings manually.
  • Use available quick-mapping options.
  • Review the configured mappings before proceeding.

For example: Source SharePoint Site → Destination SharePoint Site (Marketing → Marketing)

Review each mapping carefully and continue once the source and destination sites are correctly paired.
step

Step-7

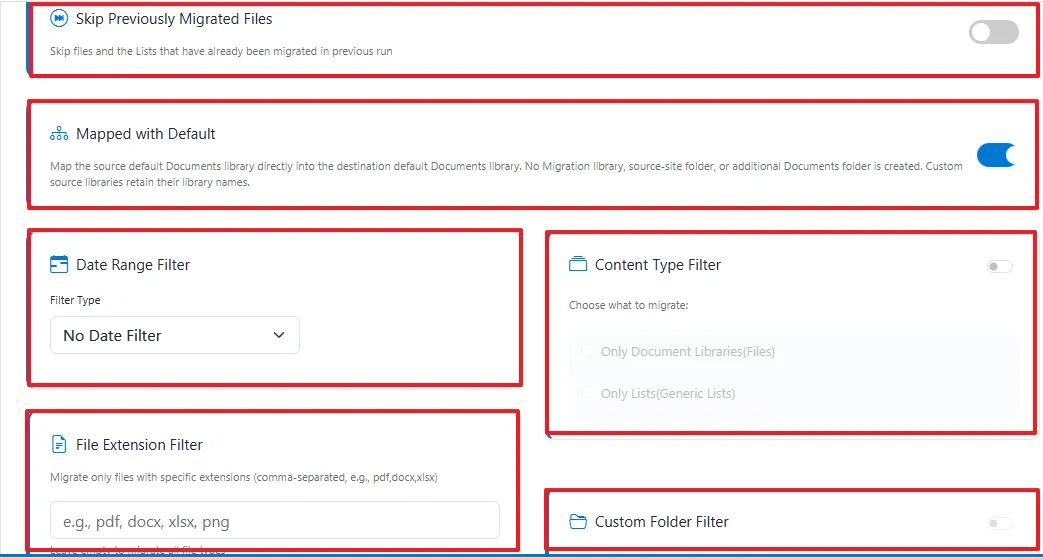
Configure Migration Filters

Before starting the migration, configure the available options to determine which SharePoint content should be copied. Depending on your requirements, you can use options such as:

  • Skip Previously Migrated Files – prevents files already transferred during an earlier run from being copied again.
  • Date Range Filter – limits migration according to file creation or modification dates.
  • File Extension Filter – includes or excludes specific file types.
  • File Size Filter – controls which files are transferred based on their size.
  • Custom Folder Name – places migrated content inside a specified folder when required.
  • Folder Mapping – determines how source folders are organized in the destination.
  • Metadata and Permissions – preserves supported SharePoint properties and access settings during migration.

Review the selected filters and mapping configuration before proceeding.
step

Step-8

Start the SharePoint Migration

Once the source-to-destination mappings and migration settings are configured, click Start Migration. The tool begins transferring the selected SharePoint files, folders, libraries, sites, and other supported content to the mapped destination SharePoint locations.

step

Step-1

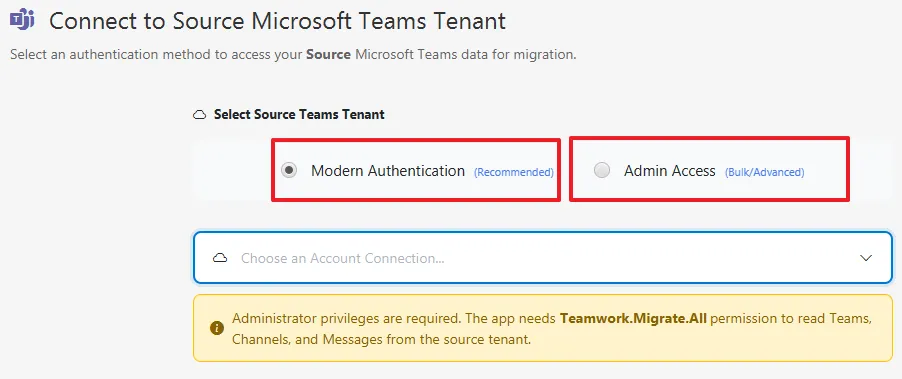
Connect to the Source Microsoft Teams Tenant

  1. Open Cigati Microsoft 365 Tenant Migration Tool → Copy → Microsoft Teams.
  2. Connect to the Source Teams Tenant using Modern Authentication and sign in with an administrator account having Teamwork.Migrate.All permission.
  3. Complete the Microsoft consent process and proceed to the Teams selection screen.

Important: Administrator privileges are required, and Teamwork.Migrate.All is needed to read Teams, channels, and messages from the source tenant.
step

Step-2

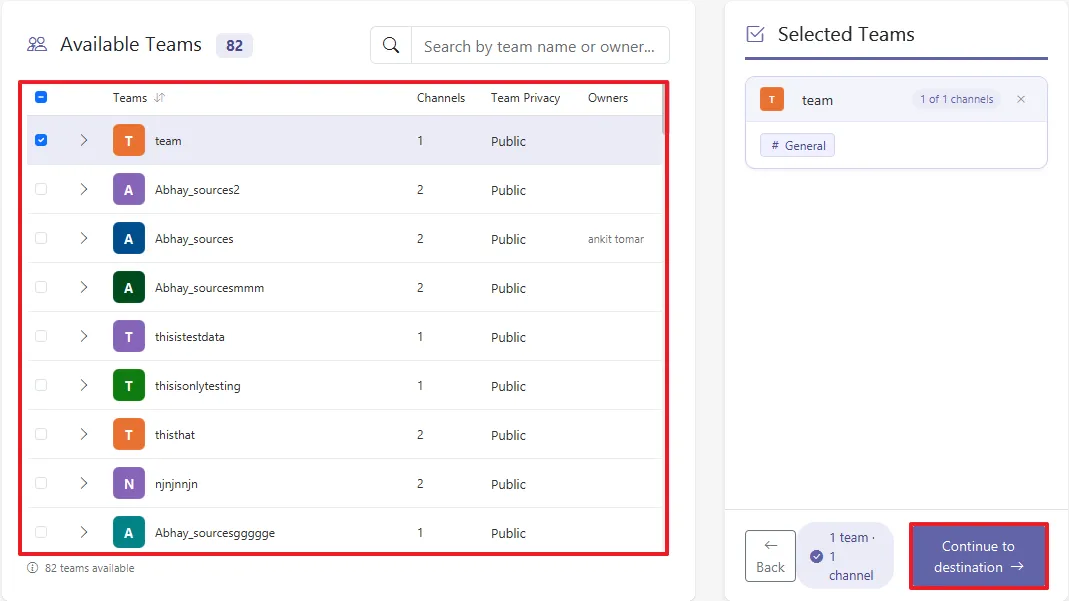
Select the Teams to Migrate

  1. On Available Teams, search and select the required Team(s) and channels.
  2. Review your selections in the Selected Teams panel.
  3. Click Continue to destination.
step

Step-3

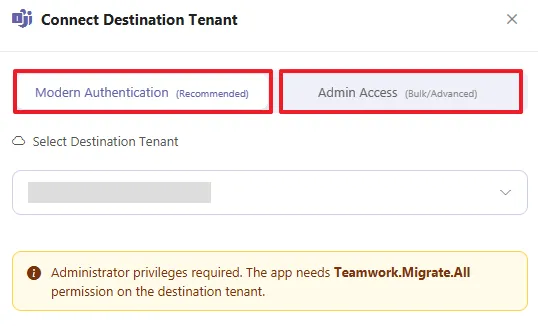
Connect to the Destination Tenant

  1. On the Destination & Options screen, review the destination tenant.
  2. If the correct tenant is not connected, click Change Connection.
  3. In the Connect Destination Tenant window, select:
    • Modern Authentication — Recommended
  4. Click Select Destination Tenant.
  5. Select the Microsoft 365 account/tenant that will receive the migrated Teams data.
  6. Complete Microsoft authentication and consent.
  7. Make sure the destination administrator has the required:
    • Teamwork.Migrate.All
  8. After successful authentication, close the connection window and return to Destination & Options.
step

Step-4

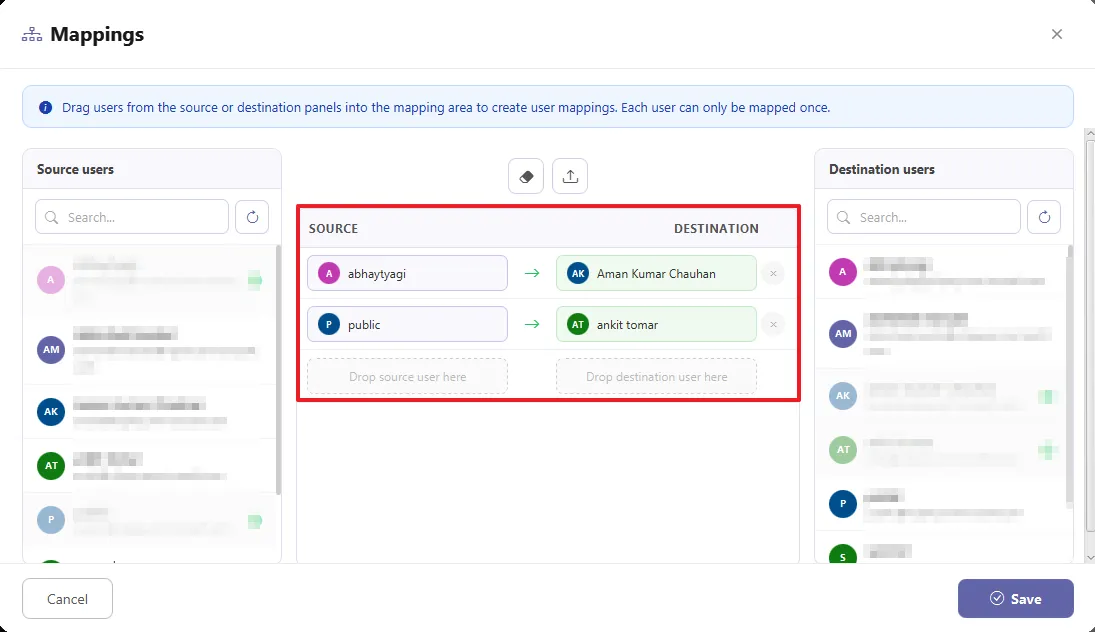
Configure User Mappings

  1. Click Mappings.
  2. The Mappings window displays:
    • Source users on the left.
    • Destination users on the right.
  3. Find the source user who needs to be mapped.
  4. Drag the source user into the SOURCE area in the center.
  5. Find the corresponding destination user.
  6. Drag the destination user into the DESTINATION area.
  7. Verify that the source and destination accounts are correctly paired.
  8. Repeat this process for all users that require mapping.
  9. Check the mappings carefully and click Save.
step

Step-5

Skip Previously Migrated Items

Enable Skip Previously Migrated Items if you are resuming an incomplete migration.

This allows compatible items that already exist in the destination to be skipped while missing or incomplete items can be retried. If this is a first-time migration, you can normally leave this option disabled.

Also review the Options section for the migration settings applicable to your Teams migration.

step

Step-6

Review the Migration

After saving the mappings:

  1. Return to Destination & Options.
  2. Confirm the destination tenant.
  3. Confirm the selected Team and number of channels.
  4. Confirm whether you are:
    • Creating a new Team, or
    • Copying channels into an existing Team.
  5. Confirm the user mappings.
  6. Review the migration options one final time.

For example: Source SharePoint Site → Destination SharePoint Site (Marketing → Marketing)

Review each mapping carefully and continue once the source and destination sites are correctly paired.

step

Step-7

Start the Teams Migration

  1. Click Start copy.
  2. Cigati will begin copying the selected Teams data from the source tenant to the destination tenant.
step

Step-1

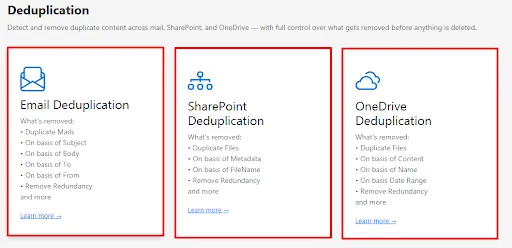
Select Deduplication

Choose the Email, SharePoint, & OneDrive Deduplication to find duplicates.
step

Step-1

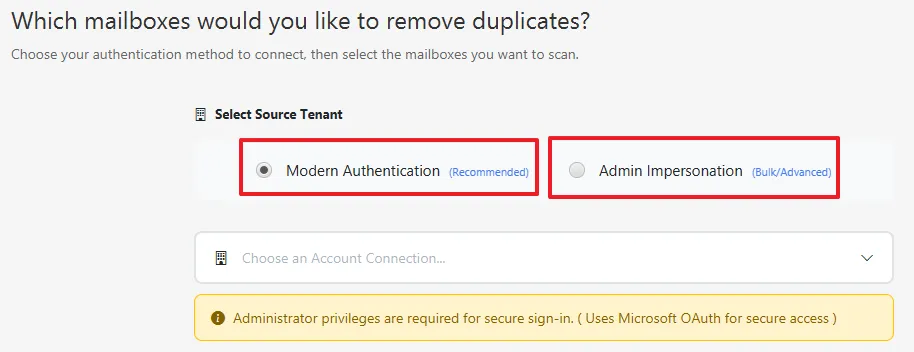
Connect to the Source Tenant

  1. Open the Deduplication module from the left panel.
  2. Under Select Source Tenant, choose Modern Authentication or Admin Impersonation.
  3. Select the required Microsoft 365 account connection and sign in with administrator privileges.
step

Step-2

Select the Mailboxes to Scan

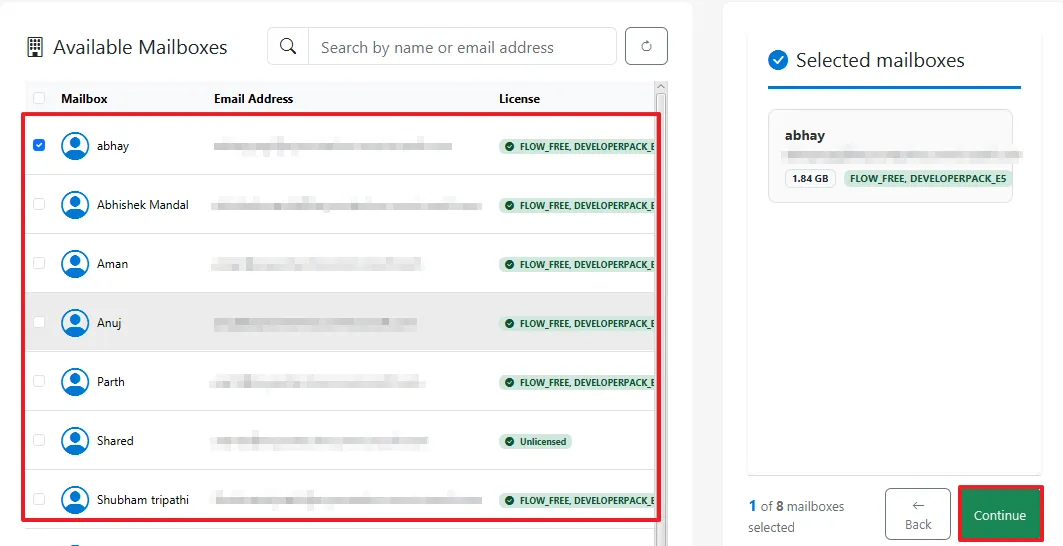
  1. Once the mailboxes are loaded, use the search box to find a mailbox by name or email address.
  2. Select the checkbox beside the mailbox(es) you want to scan for duplicates.
  3. Review the selected mailboxes in the Selected Mailboxes panel.
  4. Click Continue.
step

Step-3

Configure Duplicate Detection Settings
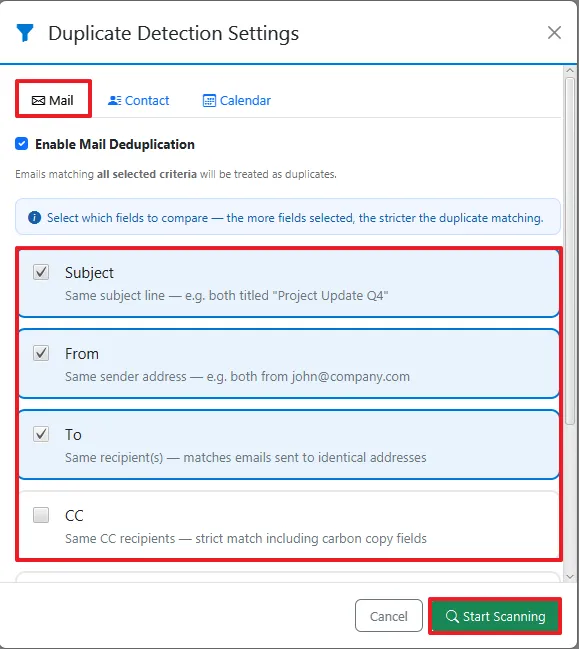
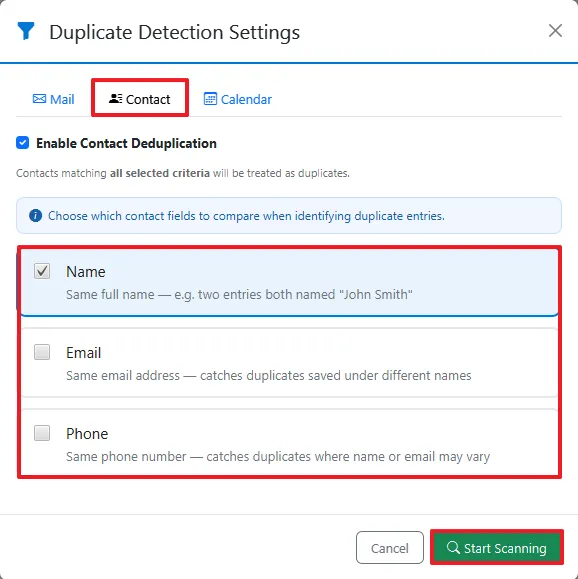
  1. In Duplicate Detection Settings, select the data type you want to deduplicate: Mail, Contact, or Calendar.
  2. For Mail, enable Mail Deduplication and select the required comparison fields, such as Subject, From, To, and CC.
step
  1. For Contact, enable Contact Deduplication and select the comparison fields such as Name, Email, and Phone.
step
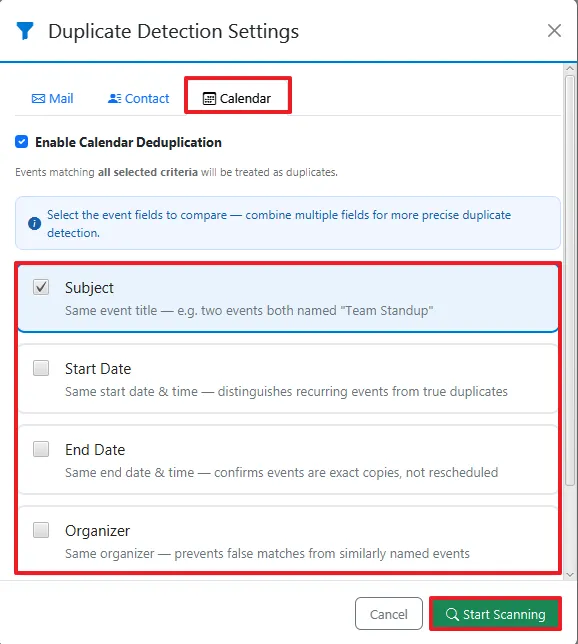
  1. For Calendar, enable Calendar Deduplication and select fields such as Subject, Start Date, End Date, and Organizer.

Note: You can enable one or more data types depending on what needs to be deduplicated.
step

Step-4

Run the Duplicate Scan

  1. Click Start Scanning to begin the duplicate detection process.
step
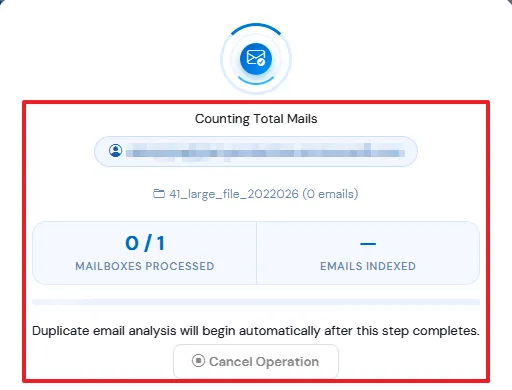
  1. The tool first counts and indexes the mailbox data before starting the duplicate analysis.
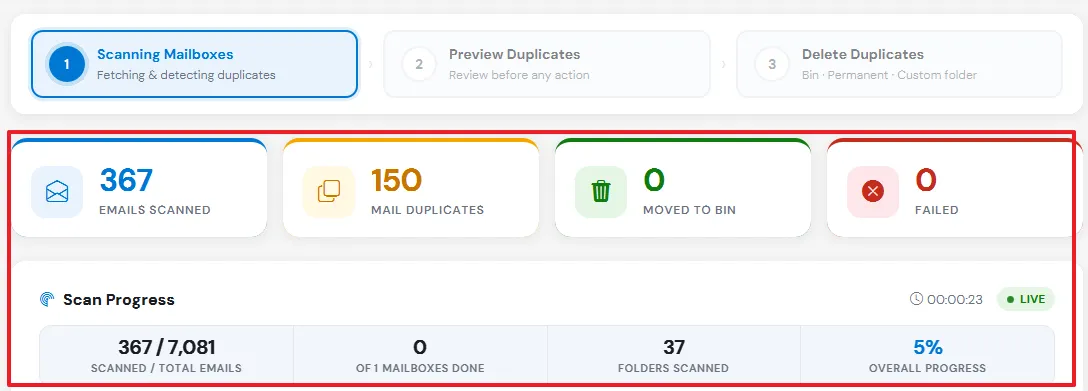
  2. Monitor the Scan Progress screen to view the number of mailboxes processed, emails indexed, elapsed time, and overall progress.
step

Step-5

Review and Remove Duplicates

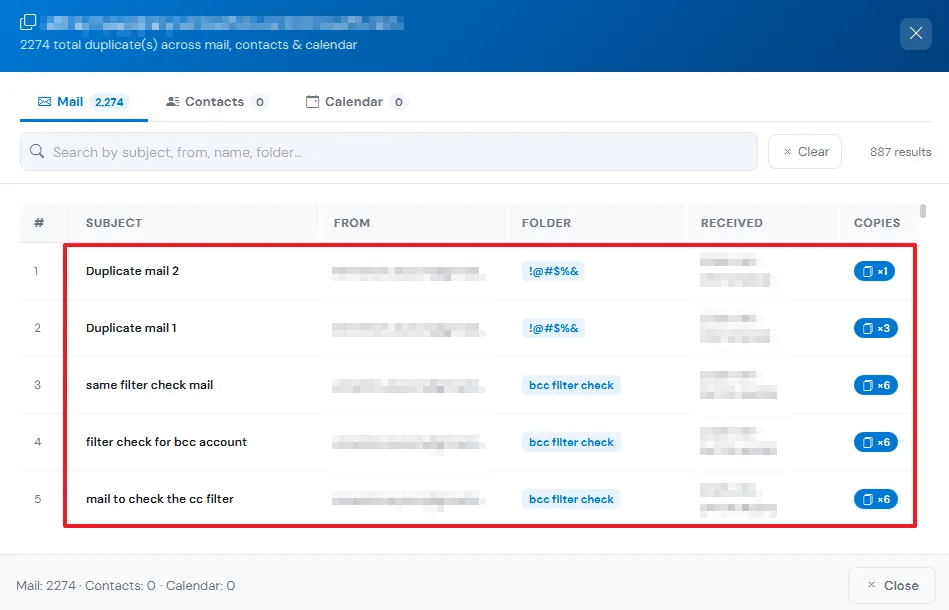
  1. After the scan is complete, review the detected duplicate items.
step
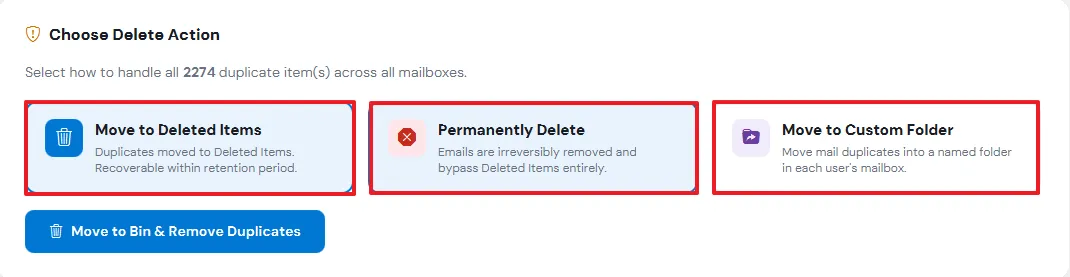
  1. Choose the required deletion option - Bin, Permanent, or Custom Folder - to handle the duplicate items.

Tip: Use Custom Folder if you'd rather review flagged duplicates manually before permanent deletion.
step

Step-1

Connect to the Source SharePoint Account

  1. Open software and click on Deduplication.
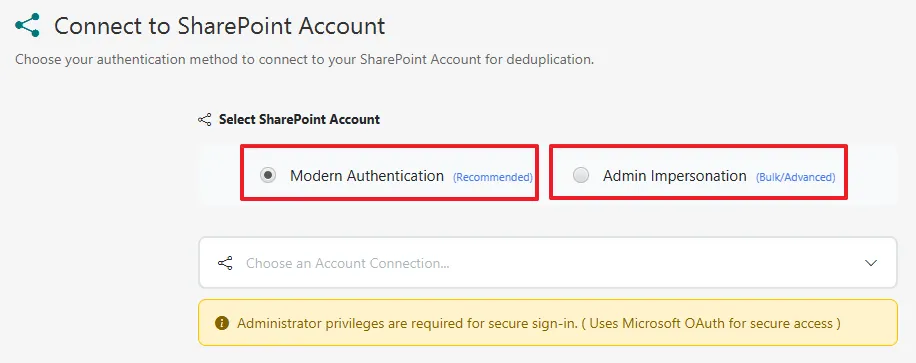
  2. On the Connect to SharePoint Account screen, choose your authentication method under Select SharePoint Account: Modern Authentication (Recommended) or Admin Impersonation (Bulk/Advanced).
  3. Select the required account connection from the Choose an Account Connection dropdown and sign in with administrator privileges.

Important: Administrator privileges are required for secure sign-in, and Microsoft OAuth is used for secure access.

Note: Your credentials are never stored. Microsoft's secure authentication protocols are used throughout.
step

Step-2

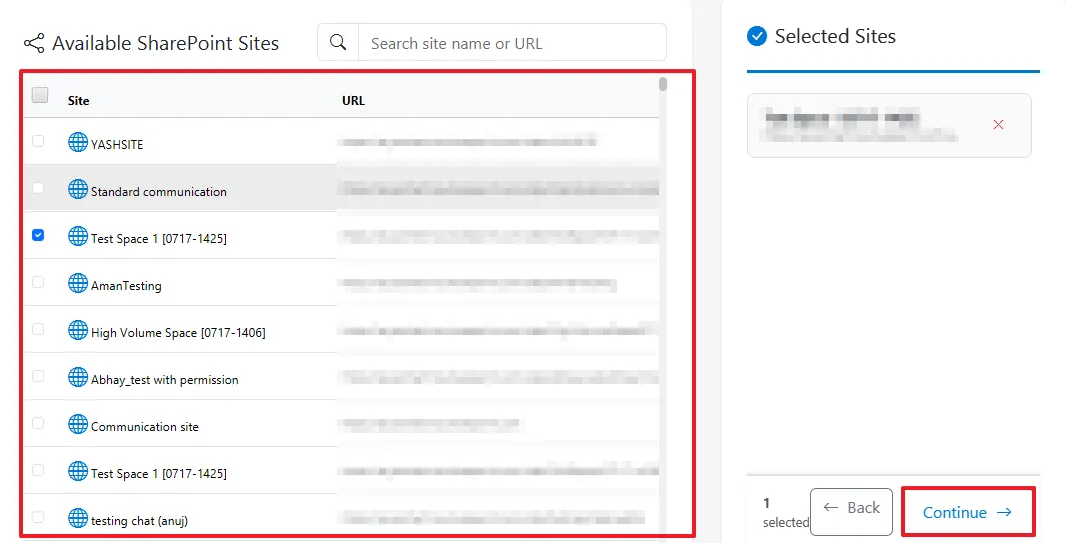
Select the SharePoint Sites to Scan

  1. On the Source Sites screen, review the list of Available SharePoint Sites.
  2. Use the search box to find a site by name or URL.
  3. Select the checkbox beside the site(s) you want to scan for duplicates.
  4. Review your selection in the Selected Sites panel on the right.
  5. Click Continue.
step

Step-3

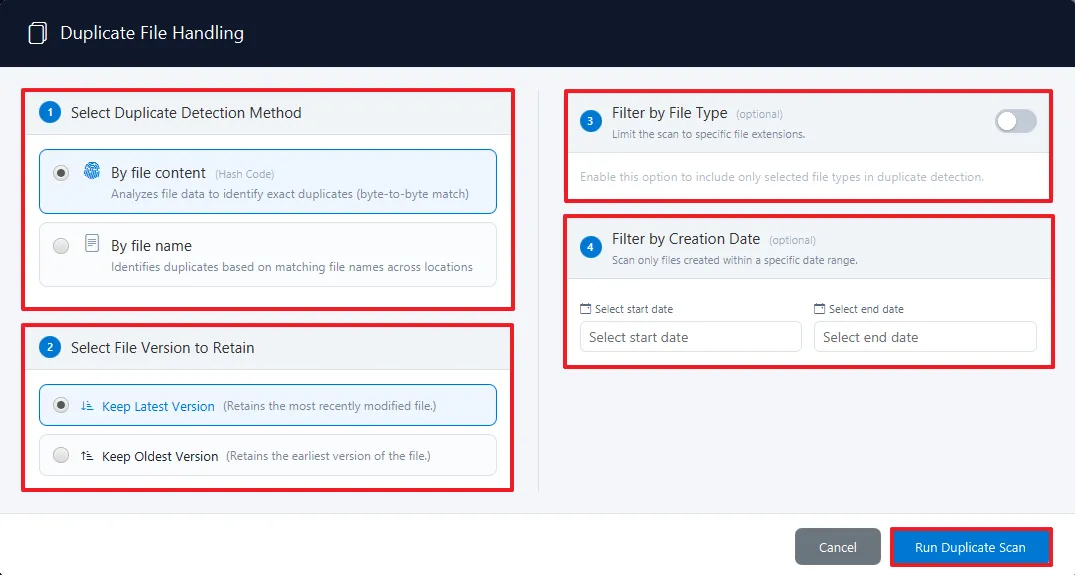
Configure Duplicate File Handling

  1. In the Duplicate File Handling window, select a Duplicate Detection Method: By File Content (Hash Code) for an exact byte-to-byte match, or By File Name to match based on file names across locations.
  2. Under Select File Version to Retain, choose Keep Latest Version or Keep Oldest Version.
  3. (Optional) Enable Filter by File Type: to limit the scan to specific file extensions.
  4. Click Select Destination Tenant.
  5. (Optional) Enable Filter by Creation Date: and set a Start Date and End Date to scan only files created within that range.
  6. Click Run Duplicate Scan.
step

Step-4

Monitor the Scan Progress

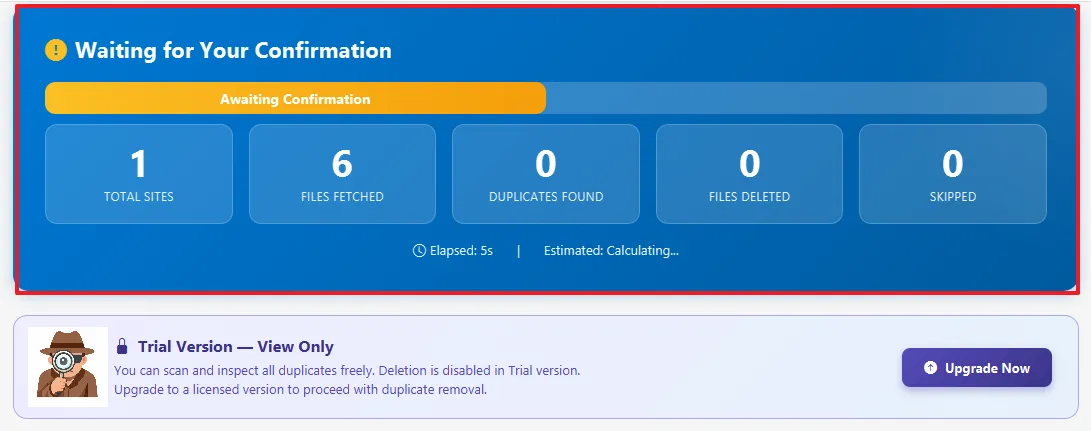
  1. On the Progress screen, view the live counters: Total Sites, Files Fetched, Duplicates Found, Files Deleted, and Skipped.
  2. Track the elapsed time and estimated completion time.
  3. Under Site-by-Site Deduplication Status, monitor each site's scan phase in real time.

Note: In the Trial Version, scanning and inspecting duplicates is free, but deletion is disabled. Click Upgrade Now to unlock duplicate removal.
step

Step-5

Review the Completed Scan

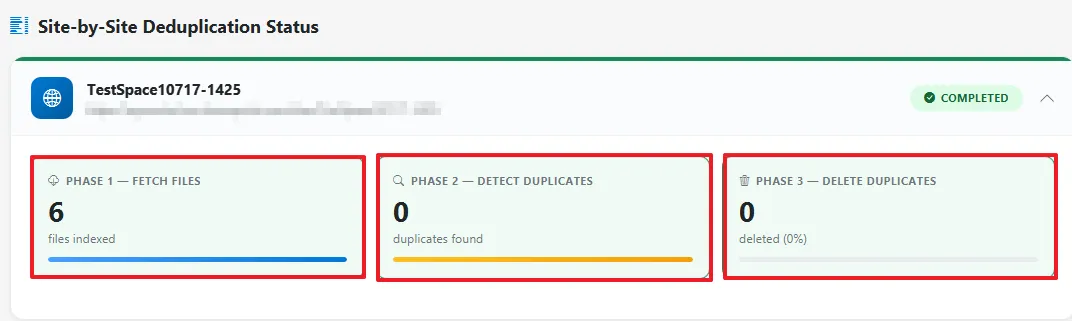
  1. Once the status changes to Completed, review the three phases for each site:
    • Phase 1 – Fetch Files: number of files indexed.
    • Phase 2 – Detect Duplicates: number of duplicates found.
    • Phase 3 – Delete Duplicates: number and percentage deleted.
  2. If duplicates were found and you're on a licensed version, proceed with deletion. In Trial mode, click Run Again to rescan, or Upgrade Now to enable deletion.
step

Step-1

Connect to the Source OneDrive Account

  1. Open Cigati Microsoft 365 Tenant Migration Tool → Deduplication.
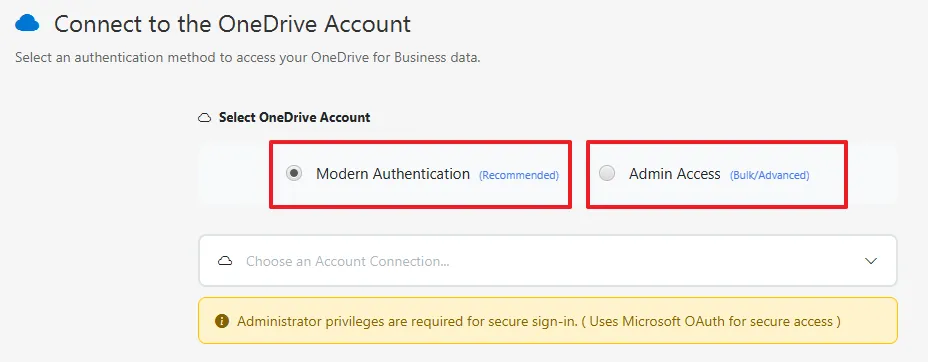
  2. On the Connect to OneDrive Account screen, choose your authentication method under Select OneDrive Account: Modern Authentication (Recommended) or Admin Impersonation (Bulk/Advanced).
  3. Select the required account connection from the Choose an Account Connection dropdown and sign in with administrator privileges.

Important: Administrator privileges are required for secure sign-in, and Microsoft OAuth is used for secure access.

Note: Your credentials are never stored. Microsoft's secure authentication protocols are used throughout.
step

Step-2

Select the OneDrive Users to Scan

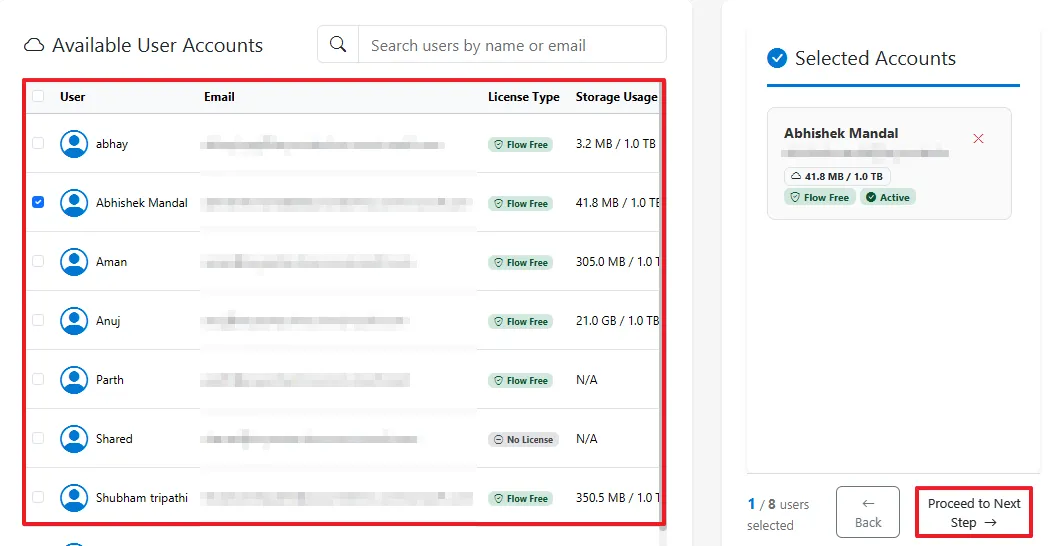
  1. On the Source Users screen, review the list of Available OneDrive Accounts.
  2. Use the search box to find a user by name or email address.
  3. Select the checkbox beside the user(s) whose OneDrive you want to scan for duplicates.
  4. Review your selection in the Selected Users panel on the right.
  5. Click Continue.
step

Step-3

Configure Duplicate File Handling

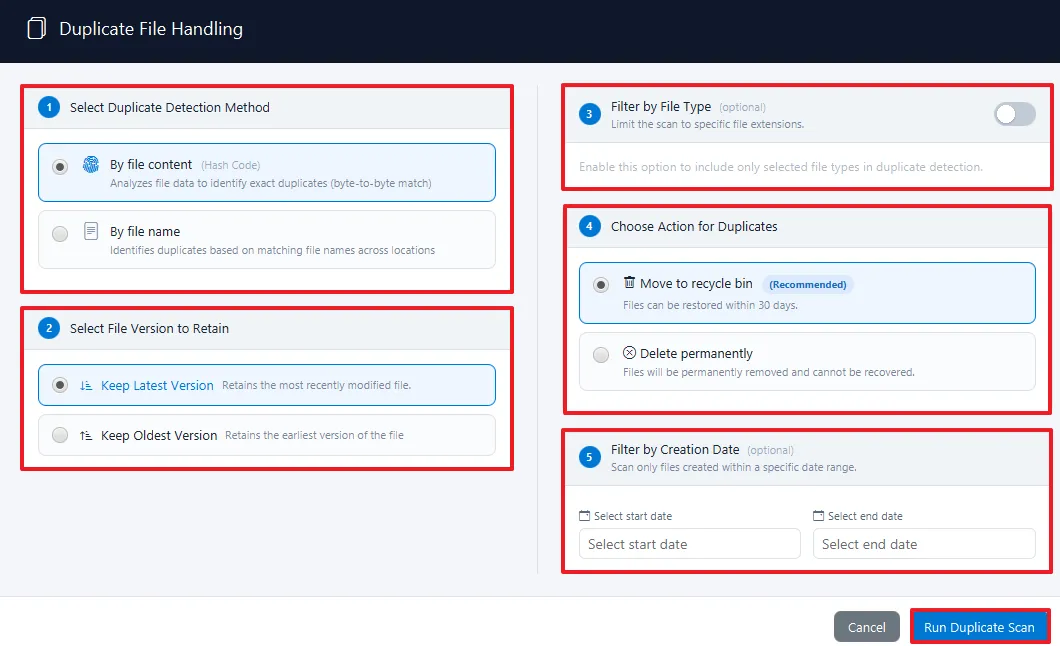
  1. In the Duplicate File Handling window, select a Duplicate Detection Method: By File Content (Hash Code) for an exact byte-to-byte match, or By File Name to match based on file names across locations.
  2. Under Select File Version to Retain, choose Keep Latest Version or Keep Oldest Version.
  3. (Optional) Enable Filter by File Type: to limit the scan to specific file extensions.
  4. (Optional) Enable Filter by Creation Date: and set a Start Date and End Date to scan only files created within that range.
  5. Click Run Duplicate Scan.
step

Step-4

Monitor the Scan Progress

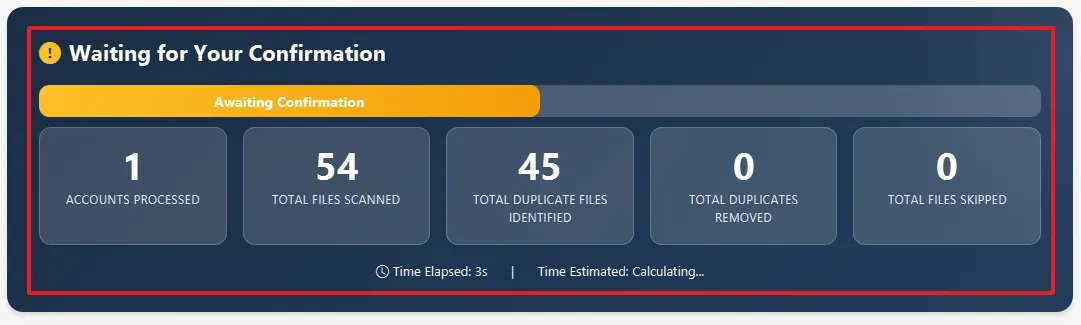
  1. On the Progress screen, view the live counters: Total Sites, Files Fetched, Duplicates Found, Files Deleted, and Skipped.
  2. Track the elapsed time and estimated completion time.
  3. Under User-by-User Deduplication Status, monitor each account's scan phase in real time.

Note: In the Trial Version, scanning and inspecting duplicates is free, but deletion is disabled. Click Upgrade Now to unlock duplicate removal.
step

Step-5

Review the Completed Scan

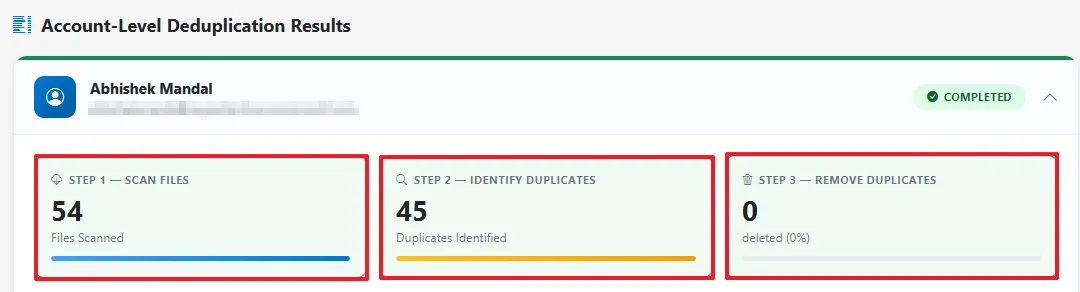
  1. Once the status changes to Completed, review the three phases for each user:
    • Phase 1 – Fetch Files: number of files indexed.
    • Phase 2 – Detect Duplicates: number of duplicates found.
    • Phase 3 – Delete Duplicates: number and percentage deleted.
  2. If duplicates were found and you're on a licensed version, proceed with deletion.
step