G Suite (Google Workspace) Backup Tool
4.7
The Cigati Google Workspace Migration Tool provides a centralized interface to migrate or back up Google Workspace data. Users can choose between Mailbox and Google Drive migration, monitor migration progress, access reports, and manage software settings. The tool supports secure migration, multiple export formats, and Microsoft 365 integration.
Please refer to the Functional & Technical Documentation (FTD) Guide for detailed instructions and troubleshooting related to Mailbox and Google Drive operations.
Launch the Tool
Install and open the Cigati Google Workspace Backup Tool on your Windows system.
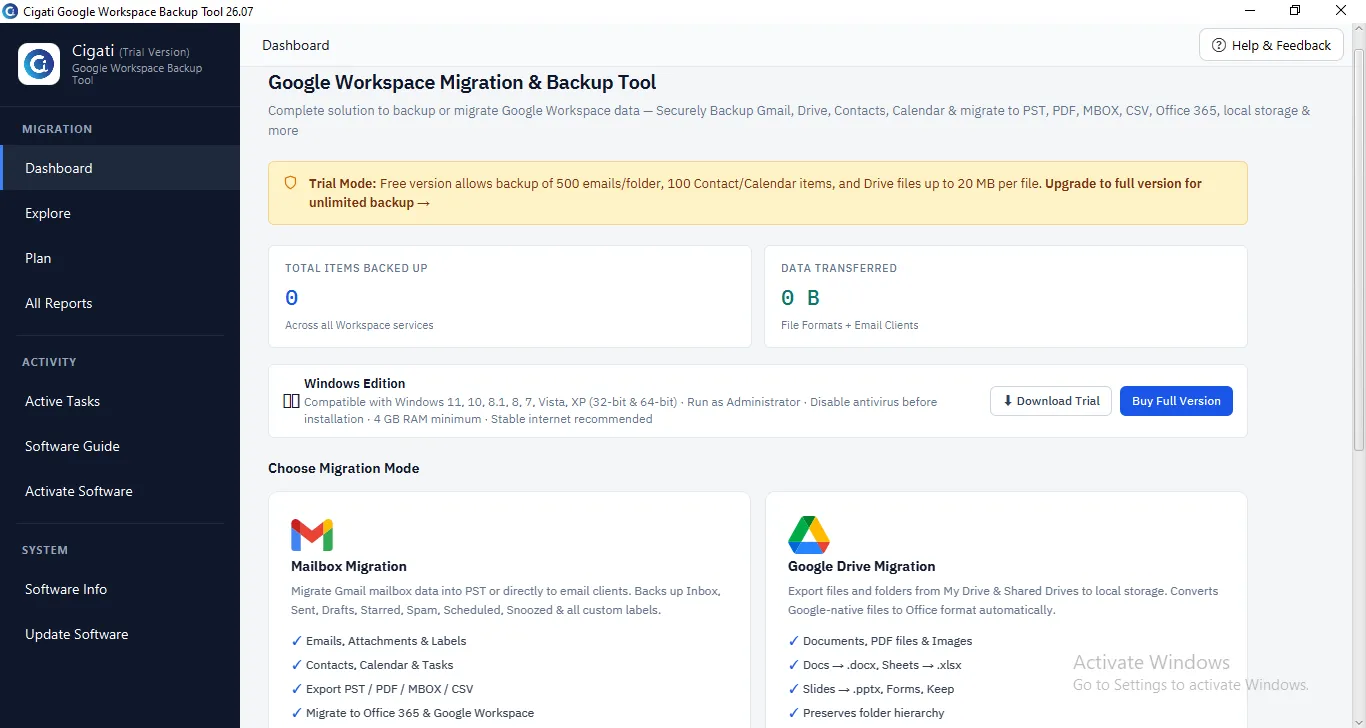
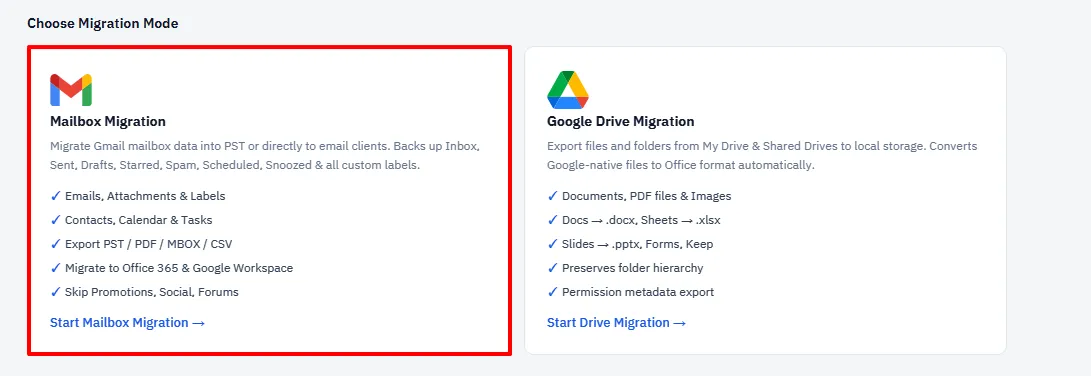
Select Mailbox Migration
From the Dashboard, click Mailbox Migration to migrate Gmail emails, contacts, calendars, tasks, and labels.
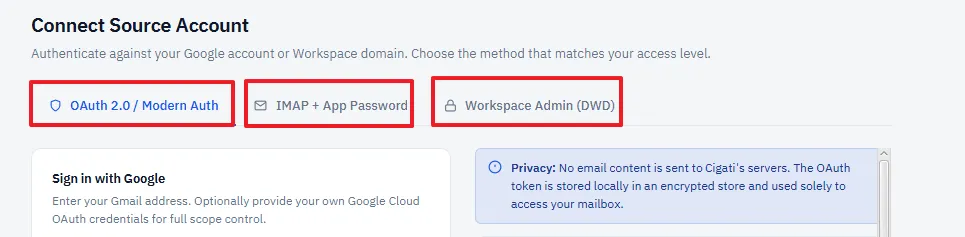
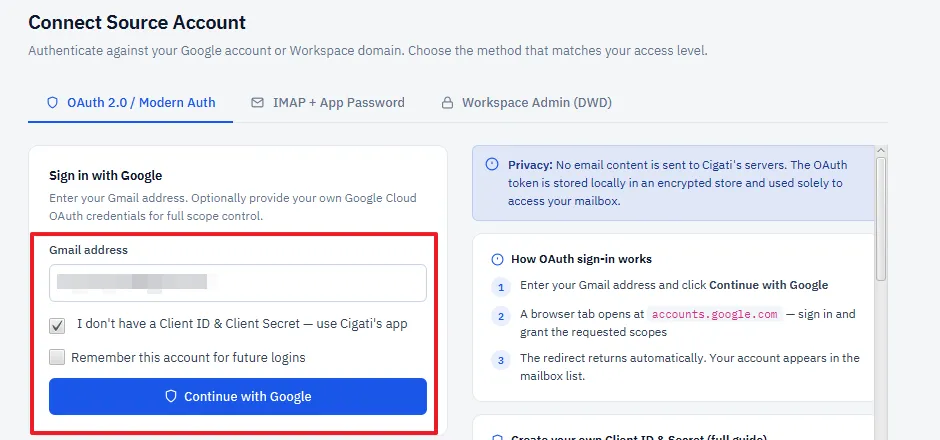
Connect the Source Google Workspace Account
Sign in using OAuth 2.0 (Modern Authentication), IMAP with App Password, or Google Workspace Admin (DWD) authentication.
Authenticate the Account
Complete the Google sign-in process and grant the required permissions to access your Google Workspace mailbox.
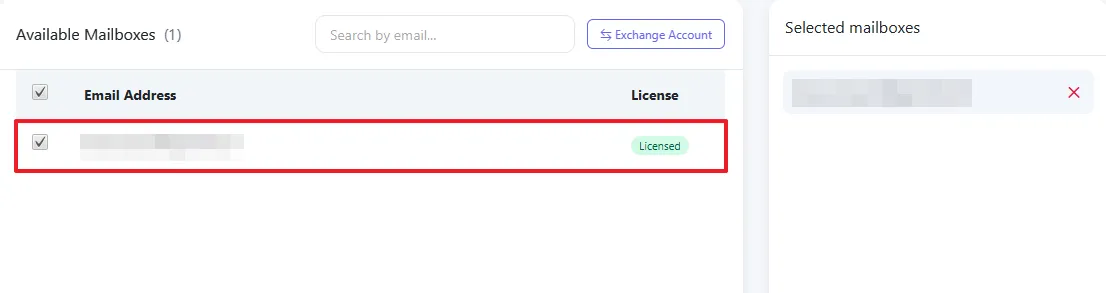
Select the Mailboxes
Choose one or more Google Workspace mailboxes you want to migrate. Use the search option for quick mailbox selection. Click on Continue.
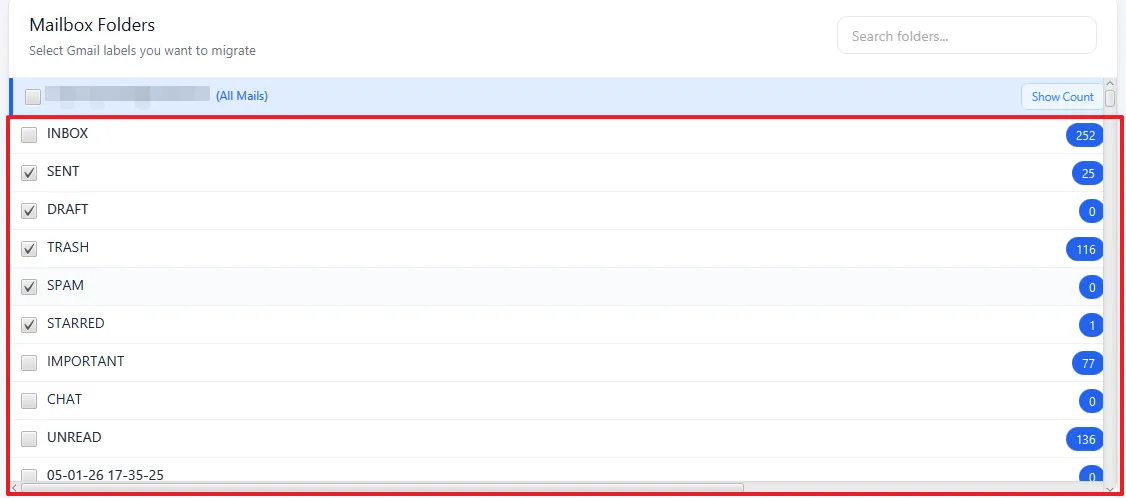
Select Gmail Folders/Labels
Choose the Gmail folders or labels you want to migrate. Optionally, use Show Count to view the number of emails in each folder. Click on Continue.
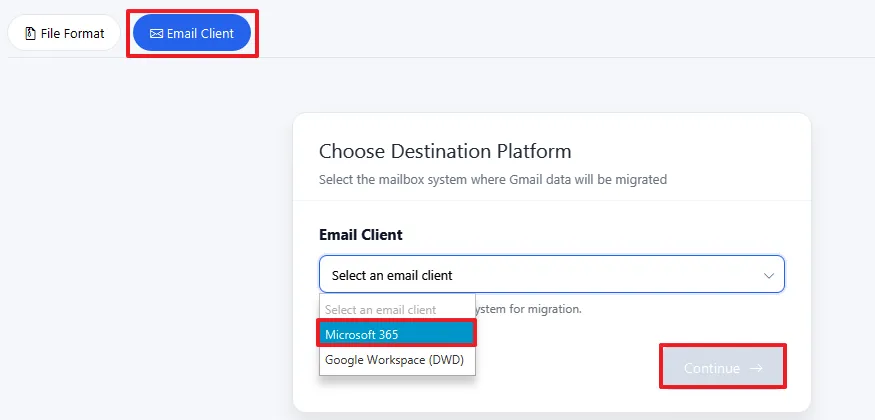
Select Microsoft 365 as the Destination
Choose Microsoft 365 from the available email client destinations and click Continue.
Connect the Microsoft 365 Account
Sign in using Single User or Admin User mode. Authenticate using Modern Authentication or Client ID, Client Secret, and Tenant ID.
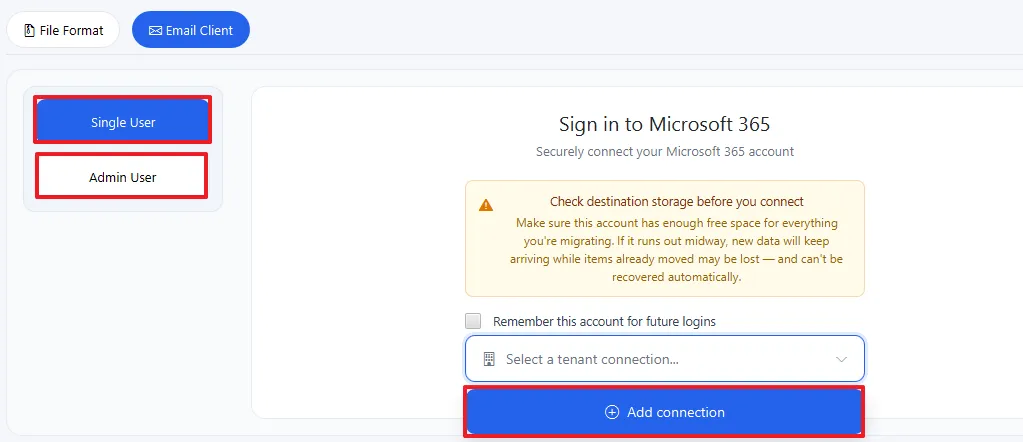
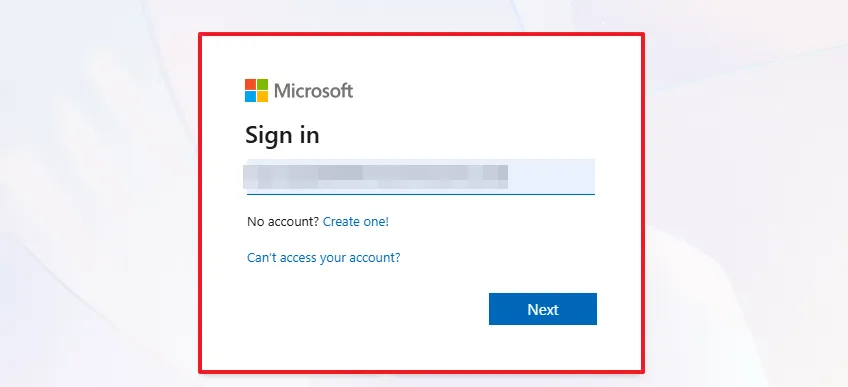
Provide Credentials for Microsoft 365
Enter the Microsoft 365 valid login credentials.
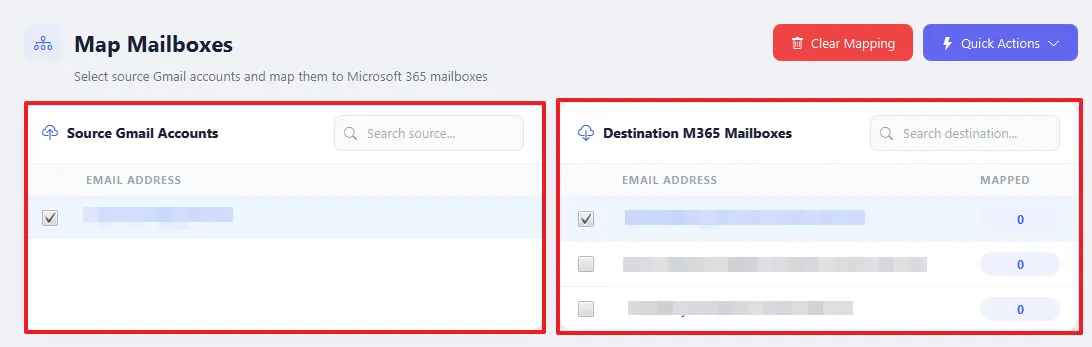
Map Source and Destination Mailboxes
Map Google Workspace mailboxes to the corresponding Microsoft 365 mailboxes. Review the mappings before proceeding.
Configure Migration Filters
Select the mailbox items to migrate, such as Emails, Contacts, Calendars, and Tasks. Apply a Date Range filter or enable Resume Migration if required.
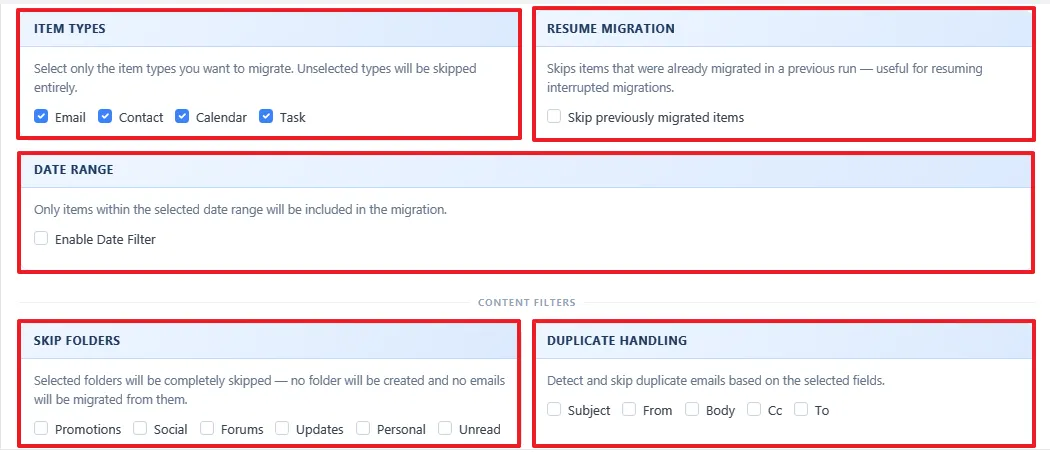
Apply Advanced Options
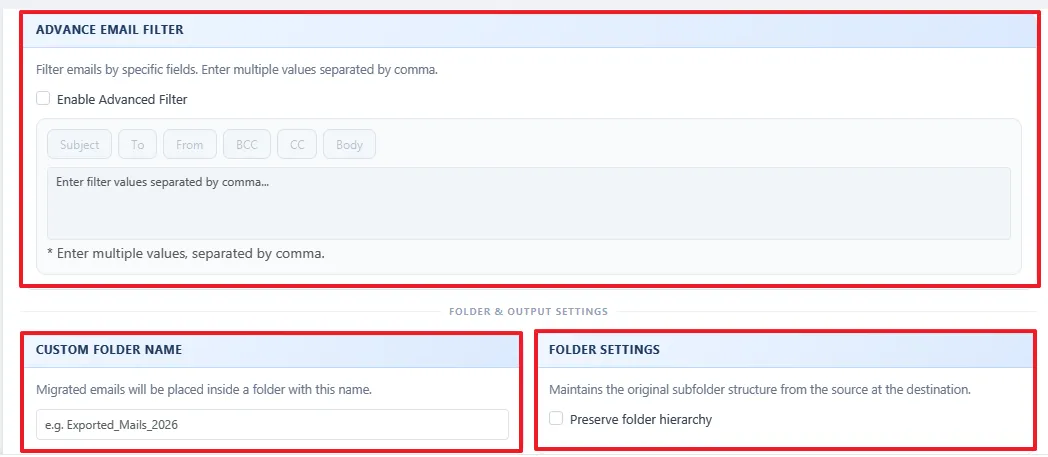
Configure additional settings such as skipping duplicate emails, excluding specific folders, preserving folder hierarchy, skipping attachments, or saving attachments separately.
Configure Additional Migration Settings
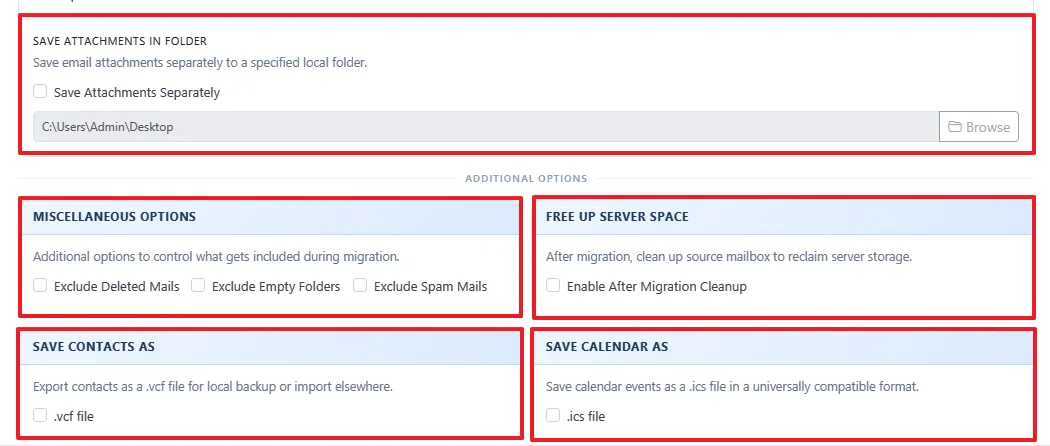
Choose optional settings like excluding deleted, spam, or empty folders. You can also export contacts as VCF, calendars as ICS, or free up server space after migration.
Start the Migration
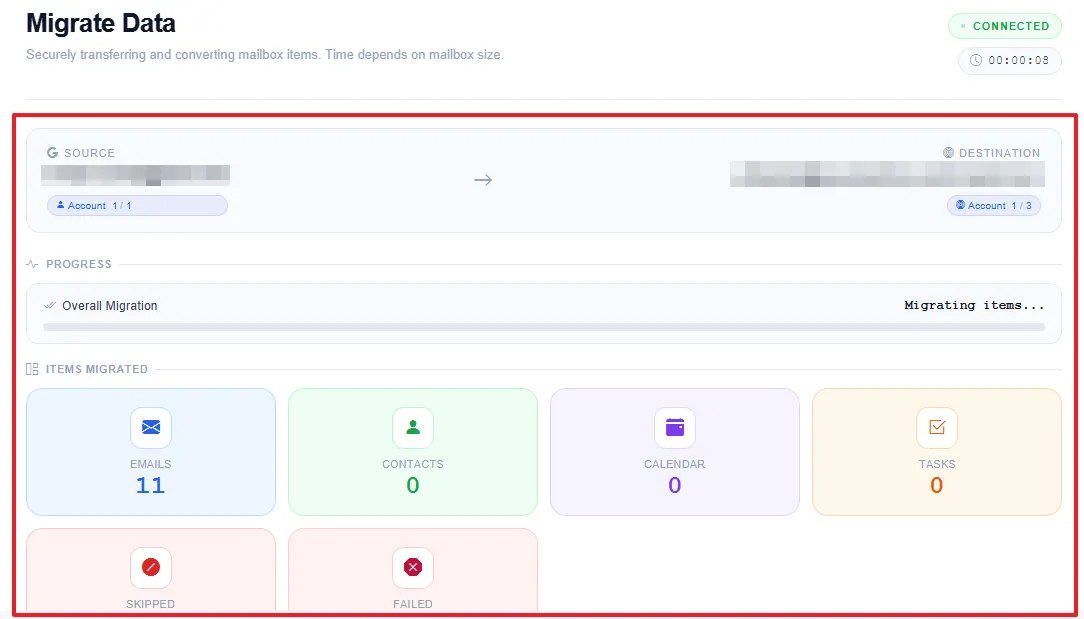
Review all selected settings and click Start Migration to begin transferring data from Google Workspace to Microsoft 365.

Review the Migration Report
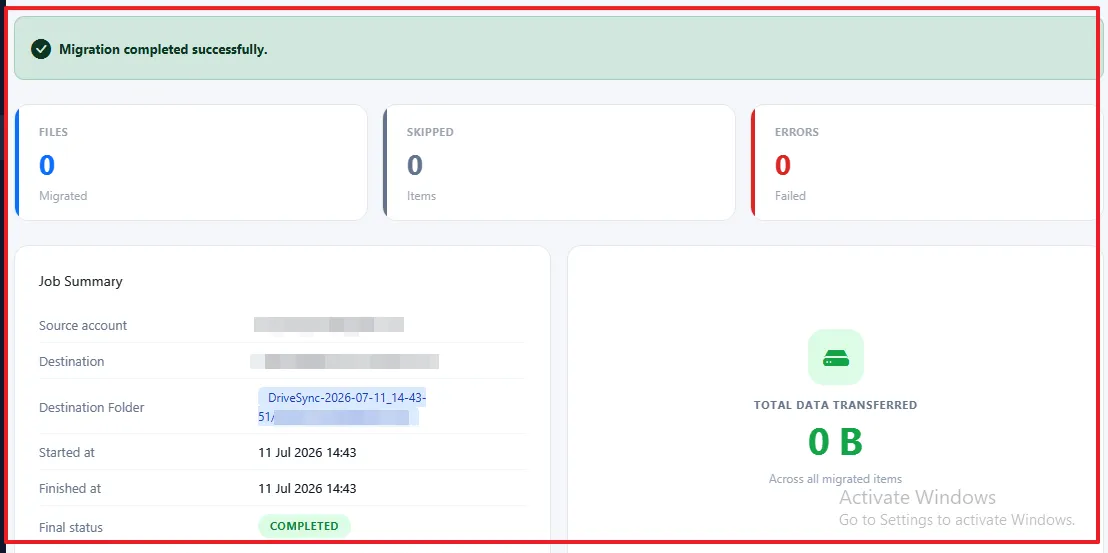
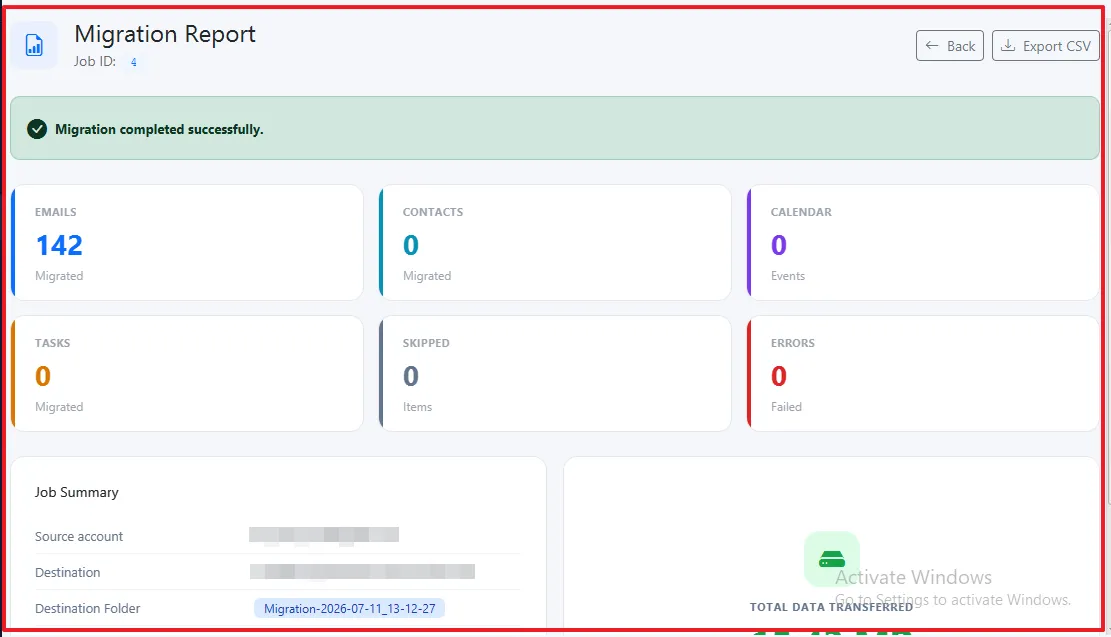
After completion, verify the migration status, transferred data size, migrated item count, skipped items, failed items, and destination mailbox details from the migration report.
Review the Migration Report
After the migration finishes, verify the migration status, total migrated items, skipped items, failed items, transferred data size, migration duration, and destination mailbox details. You can also review detailed logs from Active Tasks or All Reports.
Launch the Tool
Install and launch the Cigati Google Workspace Backup Tool on your Windows system.
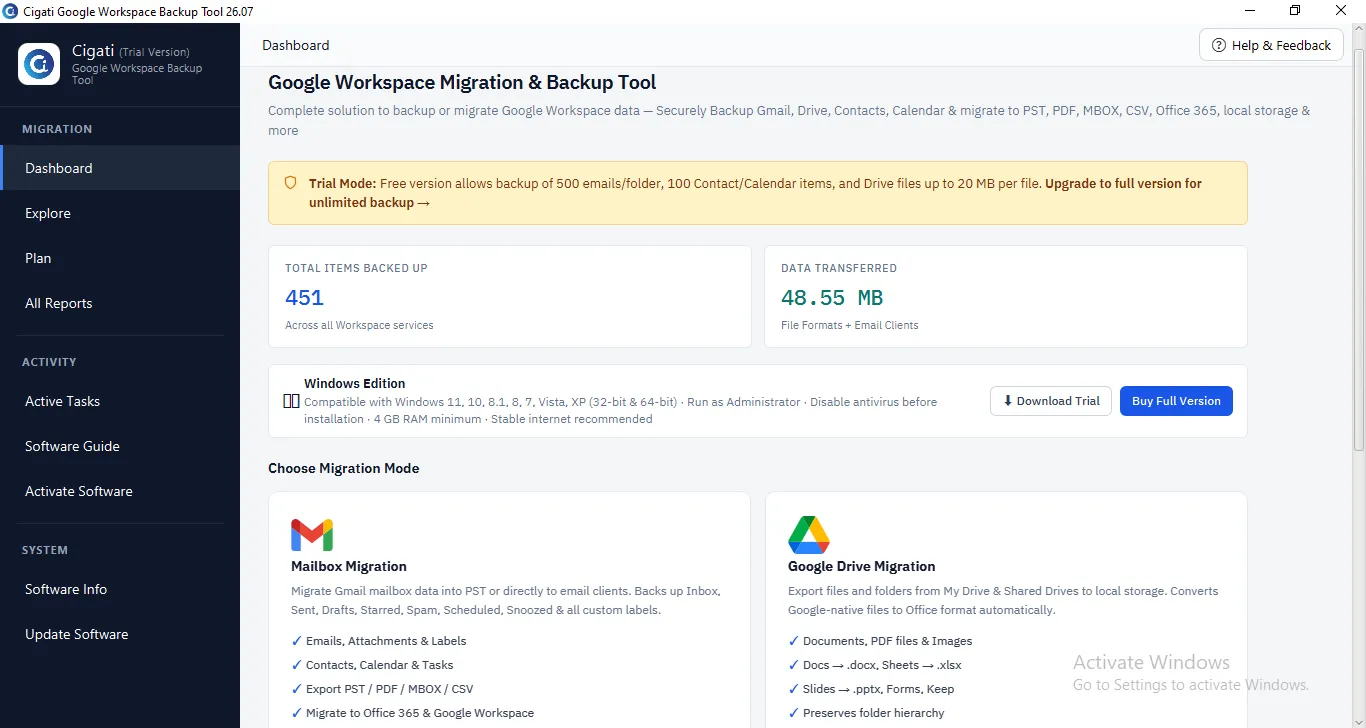
Select Google Drive Migration
From the Dashboard, click Google Drive Migration to migrate files and folders from Google Drive.
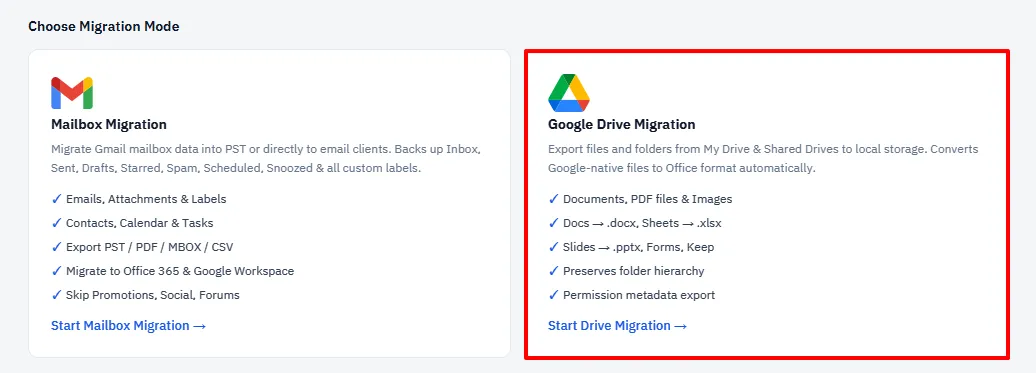
Connect the Source Google Workspace Account
Choose your preferred authentication method:
Authenticate the source Google Workspace account.
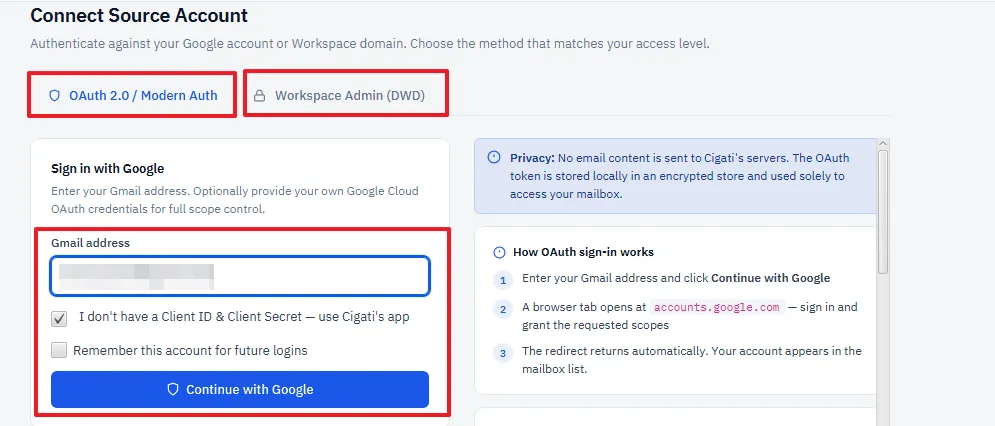
Select the Source Users
After authentication, the software displays all available Google Workspace users.
Select one or multiple users whose Google Drive data you want to migrate and click Continue.
Choose Google Workspace as the Destination
From the available destination platforms, select Google Workspace (DWD) and click Continue.
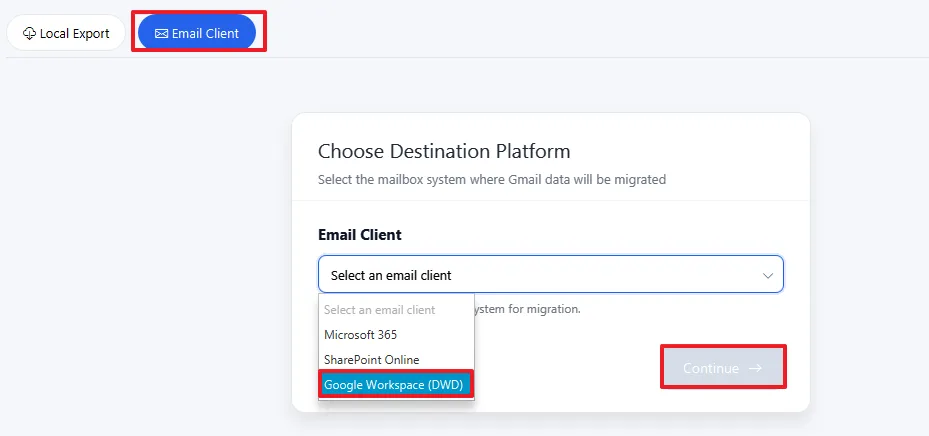
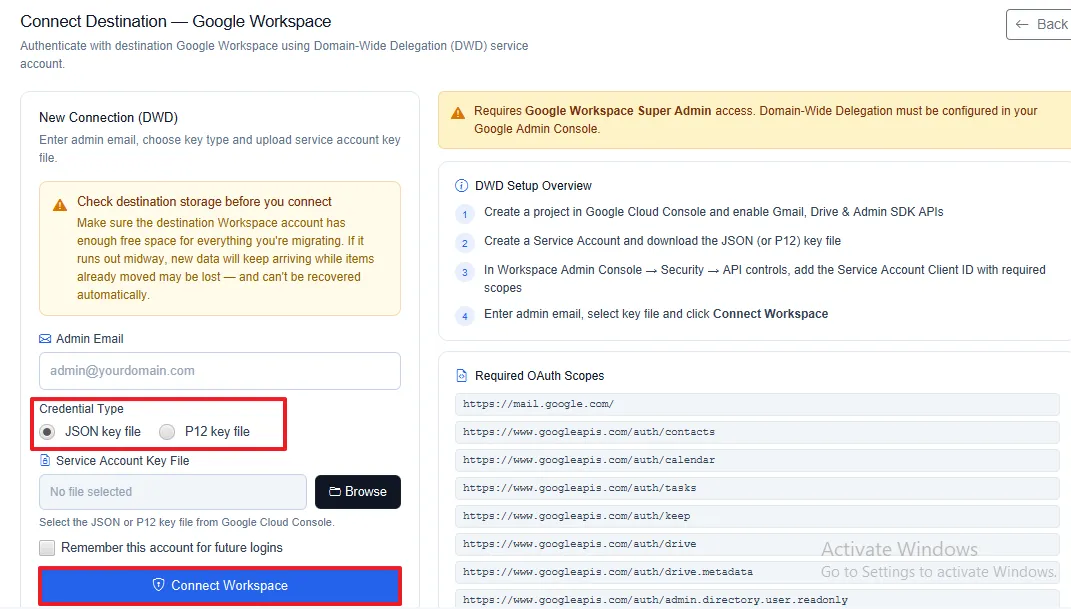
Connect the Destination Google Workspace Account
Authenticate the destination Google Workspace administrator account using:
Complete the authentication process.
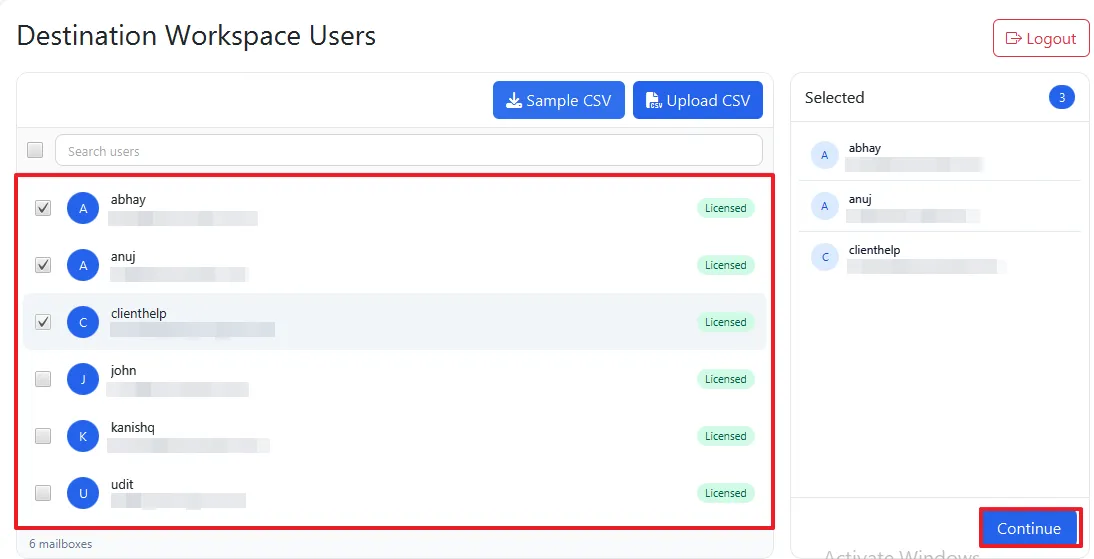
Select Destination Workspace Users
The software retrieves all users from the destination Google Workspace tenant.
Select the destination users who will receive the migrated Google Drive data.
Map Source and Destination Users
p Map each source Google Workspace user to the corresponding destination Google Workspace user. Review the mappings before proceeding.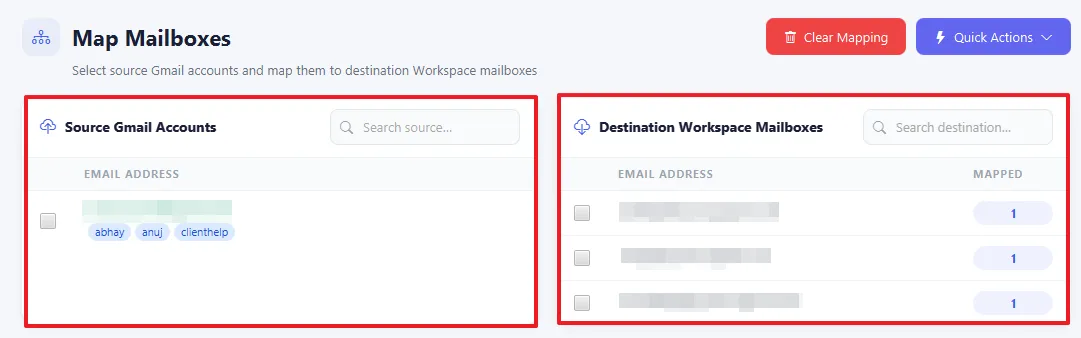
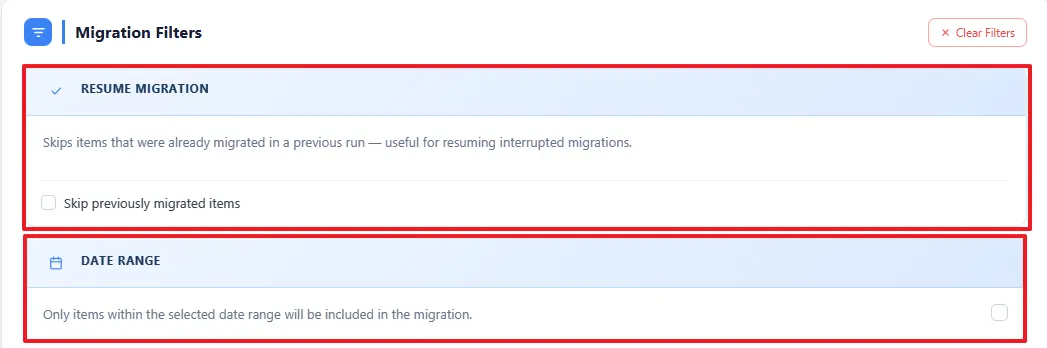
Configure Resume and Date Filters
Configure the migration by enabling Resume Migration to continue interrupted migration jobs without reprocessing completed items. Apply the Date Range Filter to migrate only files that fall within the specified time period.
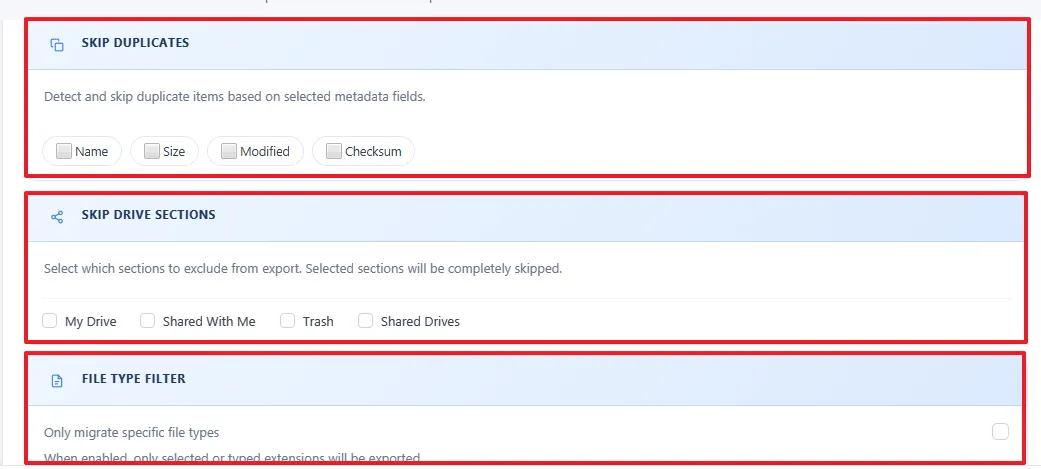
Configure File Filters
Apply advanced file filters to skip duplicate files, filter by file type, and set minimum or maximum file size limits. These options help migrate only the files that meet your selected criteria.
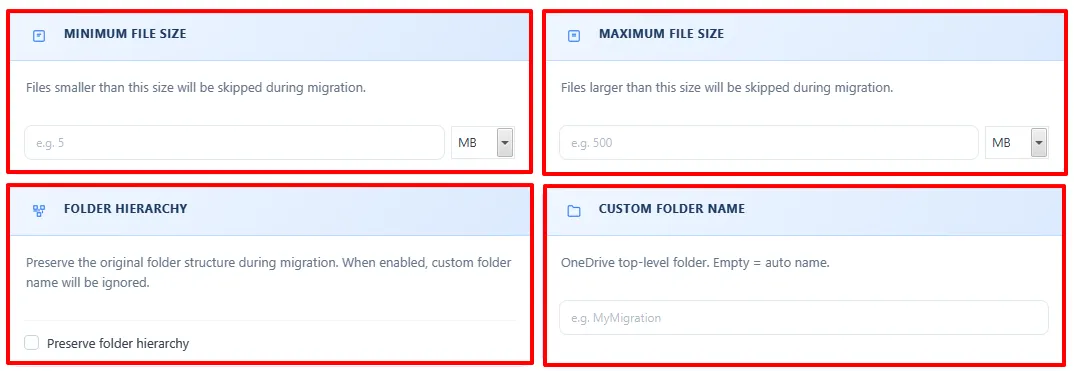
Configure Folder Options
Enable Preserve Folder Hierarchy to keep the original folder and subfolder structure intact during migration. You can also use Custom Folder Name to save the migrated data in a folder with a name of your choice. Verify the selected users, destination account, mapping configuration, and all migration filters before starting the process.
Start the Migration
Click Start Migration to begin transferring Google Drive files from the source Google Workspace account to the destination Google Workspace tenant.

Review the Migration Report
After the migration is complete, review the migration summary, including migrated files, skipped items, failed items, total transferred data, and migration status. You can also monitor the results through Active Tasks or All Reports.