How It Works

Cigati Exchange Server to PST Backup Tool

Cigati Exchange Server to PST Backup Tool helps administrators back up Exchange Server mailbox data to PST files. It can export emails, contacts, calendars, tasks, notes, and other mailbox items while maintaining the original folder structure. The tool supports selective or bulk mailbox backup and provides filters to export only the required data. This guide explains the complete process of using the Cigati Exchange Server to PST Backup Tool, from connecting to the Exchange Server and selecting mailboxes to applying filters and saving the backup as PST.

strip-img

Exchange Server to PST Backup Tool

4.7

Download Purchase

Step-1

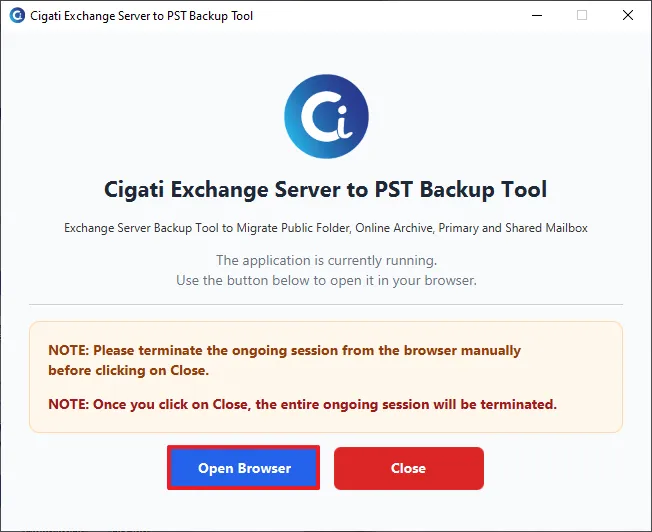
Launch the Cigati Exchange Server to PST Backup Tool. Click Open Browser to launch the backup interface in your web browser.
step

Step-2

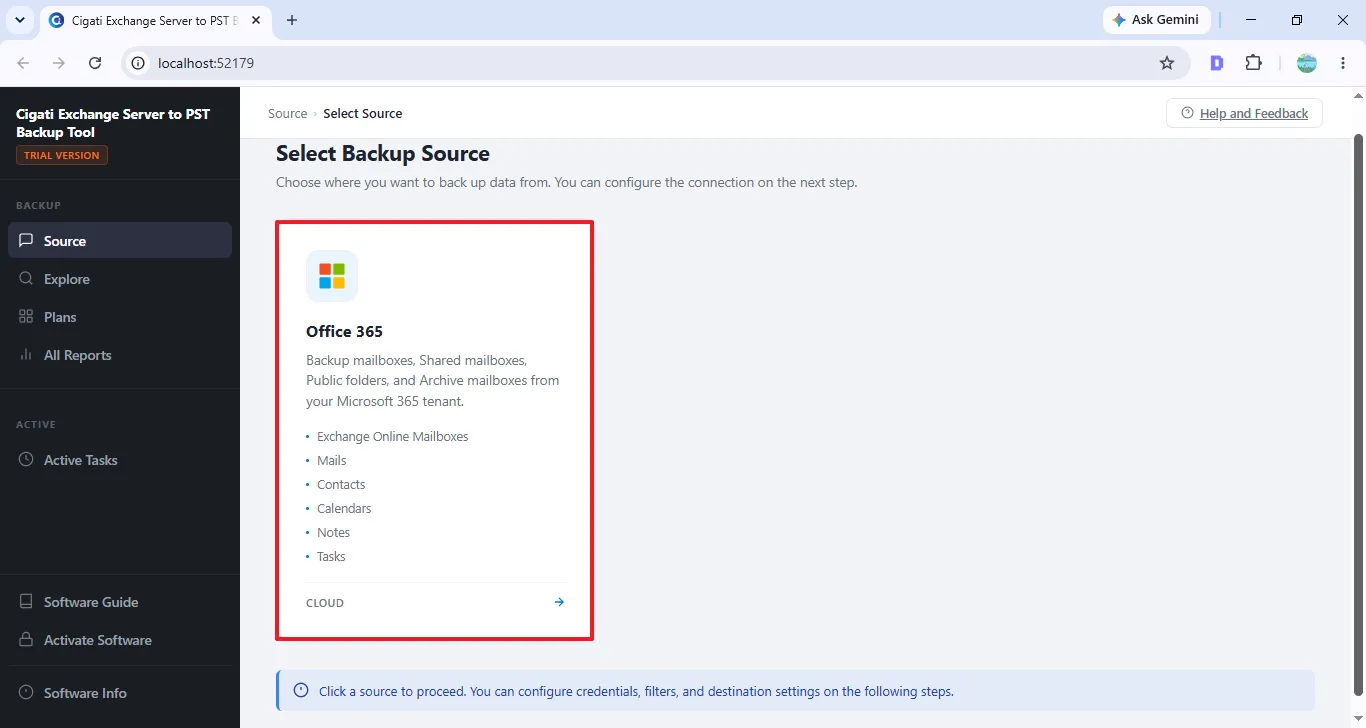
On the Select Backup Source page, choose Office 365. The tool supports backing up Exchange Online mailboxes, shared mailboxes, public folders, and archive mailboxes.
step

Step-3

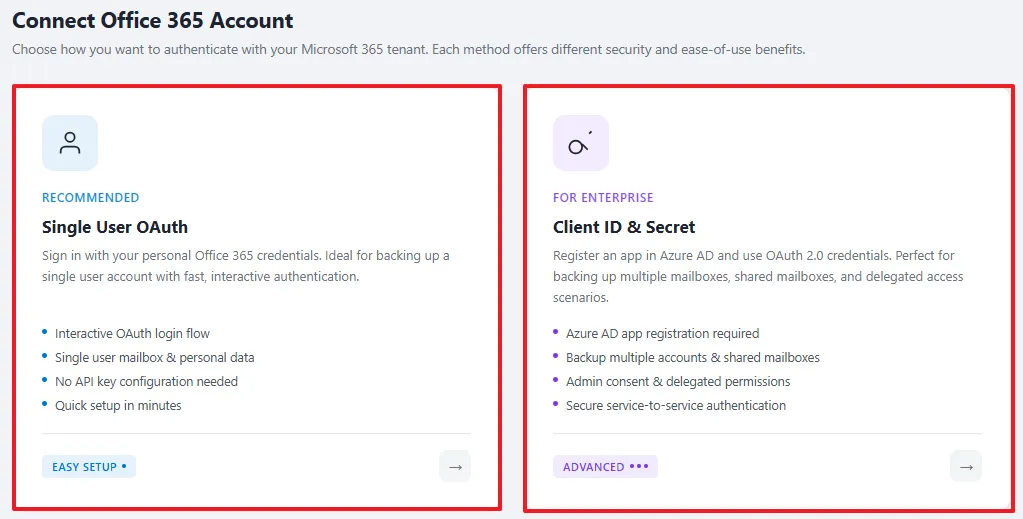
Choose an Authentication Method

  • Single User OAuth – recommended for backing up an individual mailbox.
  • Client ID & Secret – suitable for multiple mailboxes and enterprise-level backup.
step

Step-4

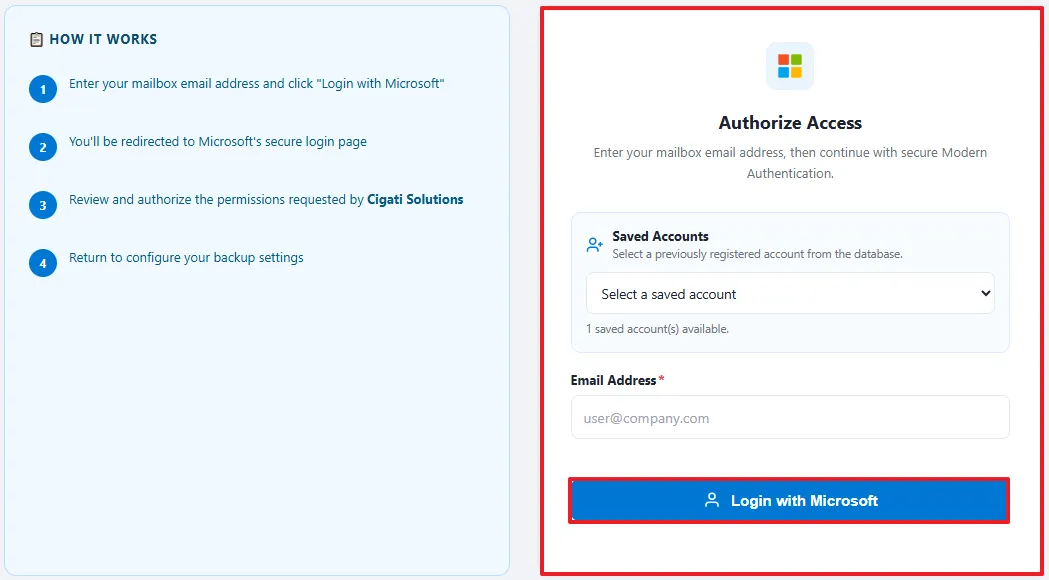
For Single User OAuth, enter the mailbox email address and click Login with Microsoft.
step

Step-5

Authenticate Your Microsoft 365 Account
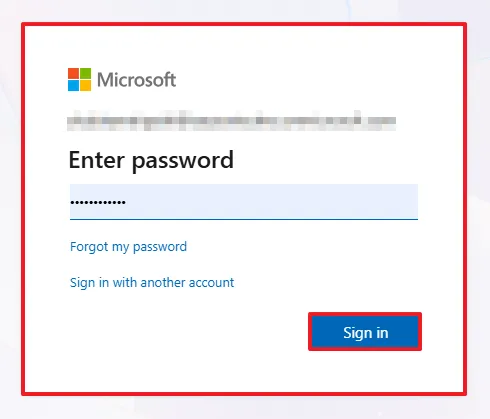
  • You will be redirected to the Microsoft sign-in page.
  • Enter your Microsoft 365 password and complete the authentication process.
  • Review and authorize the permissions requested by Cigati Solutions.
  • Return to the backup application.
step

Step-6

For Enterprise, configure Client ID & Secret Authentication (if selected)
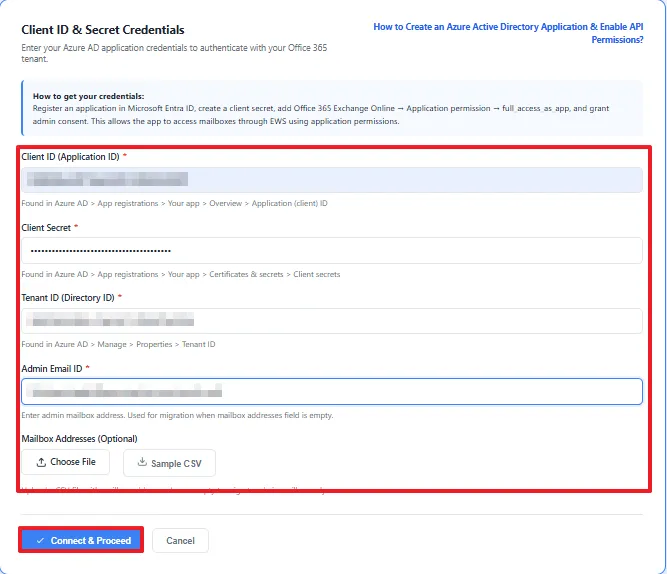
  • Enter the following details: Tenant ID, Client ID (Application ID), Client Secret, and Admin Email ID.
  • You can also upload a CSV file containing mailbox addresses for bulk processing.
  • Click Connect & Proceed.
step

Step-7

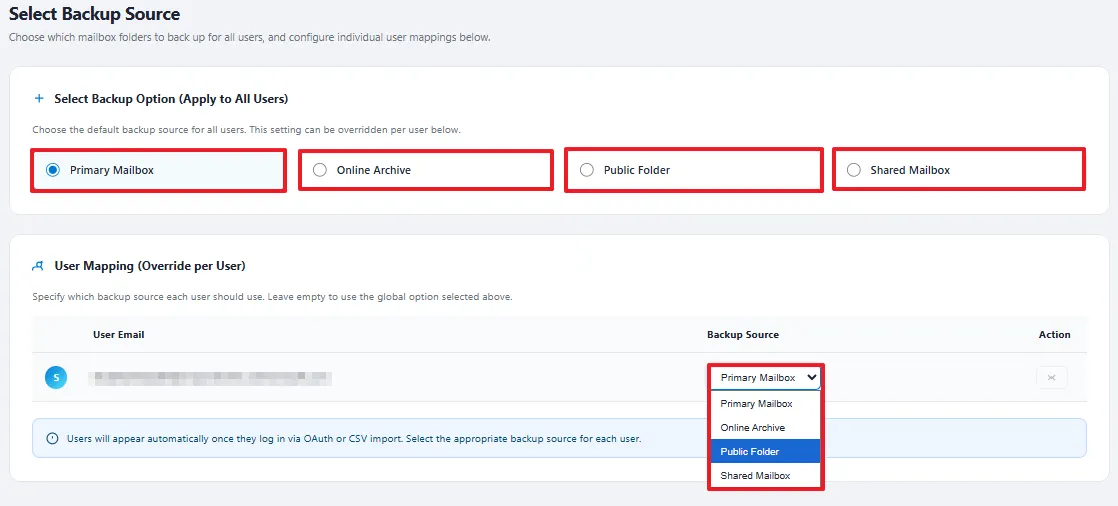
Select the Backup Source for Mailboxes

Choose the default backup source to apply to all users: Primary Mailbox, Online Archive, Public Folder, and Shared Mailbox.

You can override this setting for individual users using User Mapping.
step

Step-8

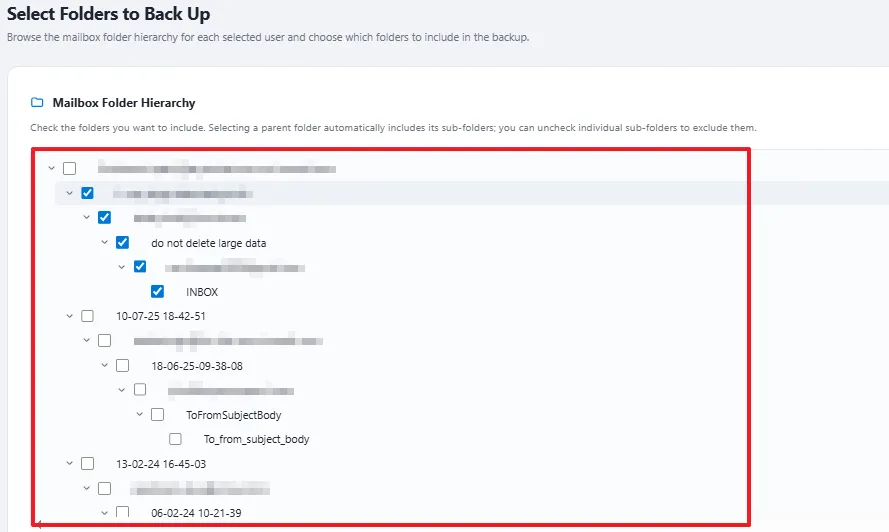
Select Mailbox Folders

  • The tool displays the mailbox folder hierarchy.
  • Select the folders you want to include in the backup.
  • Selecting a parent folder automatically includes its subfolders.
  • You can deselect individual subfolders when needed.
step

Step-9

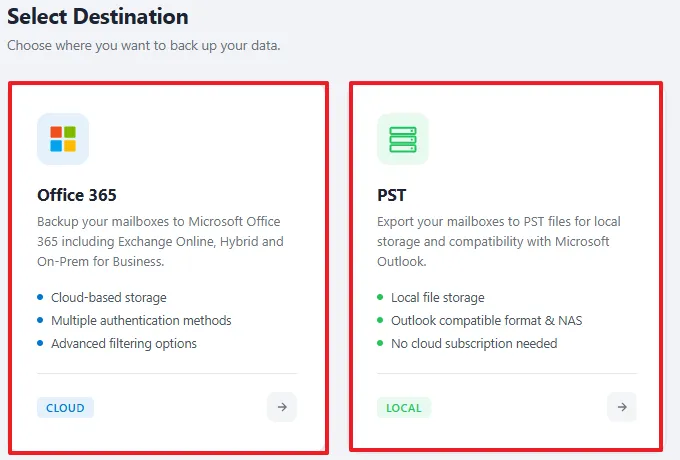
Select the Destination

Choose Office 365 or PST as the destination. The PST option allows you to save mailbox data locally in an Outlook-compatible format, while Office 365 lets you back up the data directly to another Microsoft 365 mailbox.
step

Step-10

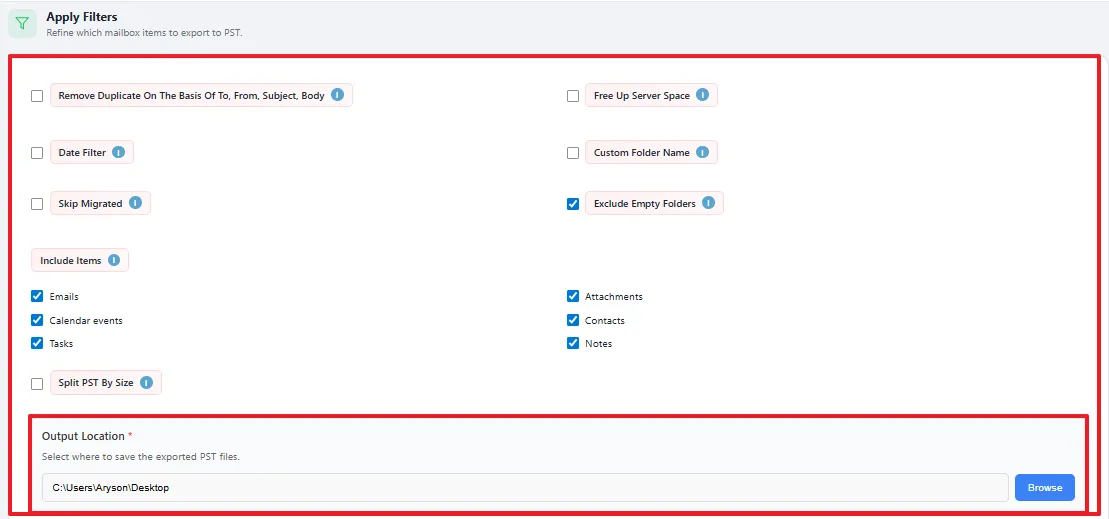
Configure the filters:

  • Remove Duplicates: Removes duplicate mailbox items based on their message details to avoid repeated data in the PST.
  • Date Filter: Exports only the mailbox items that fall within the selected date range.
  • Skip Migrated: Skips items that have already been migrated or backed up to avoid processing them again.
  • Free Up Server Space: Removes backed-up data from the source server to help free up mailbox storage space.
  • Custom Folder Name: Lets you specify a custom name for the exported mailbox folder.
  • Exclude Empty Folders: Skips folders that contain no data from the PST backup.
  • Split PST by Size: Divides the exported data into smaller PST files based on the selected size limit.
    • Emails: Includes email messages in the PST backup.
    • Attachments: Includes email attachments along with their corresponding messages.
    • Calendar Events: Backs up calendar appointments, meetings, and other events.
    • Contacts: Includes saved contact information in the backup.
    • Tasks: Backs up tasks and their associated details.
    • Notes: Includes Outlook notes in the PST file.
  • Choose the Output Location: Selects the local folder where the exported PST files will be saved.
step

Step-11

Start the Backup

Click Start Backup to begin exporting the selected Office 365 mailbox data to PST.

step

Step-10

Choose a method for destination login
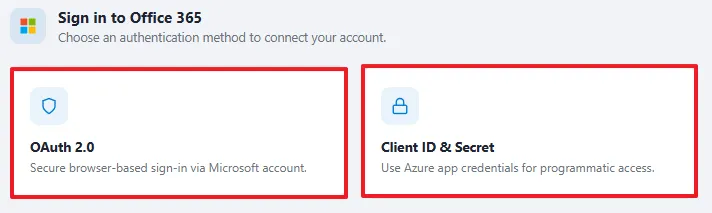
  • OAuth 2.0: Select this option to securely sign in to Office 365 through your Microsoft account using a browser-based authentication process.
  • Client ID & Secret: Select this option to connect using Azure/Entra application credentials.
step

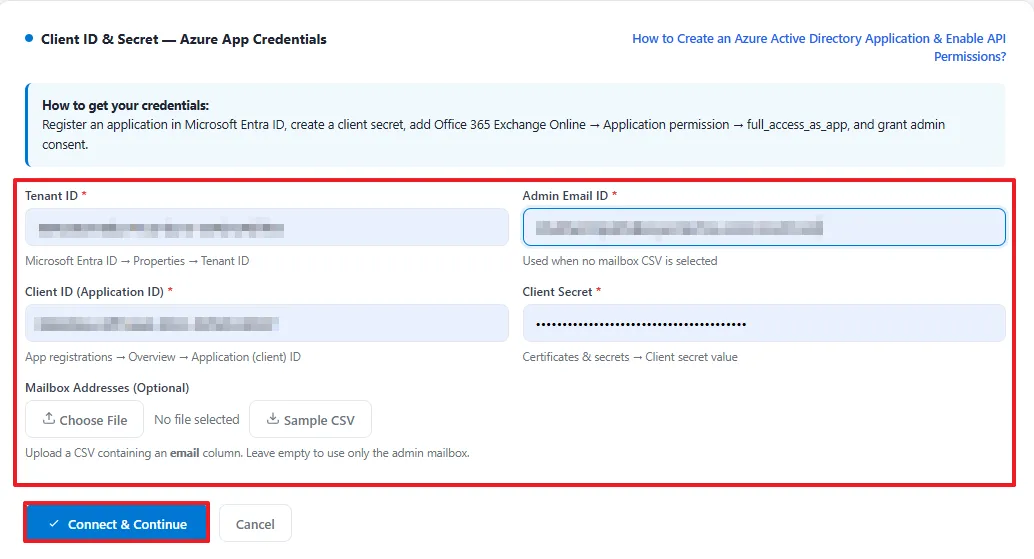
Step-11

Enter the Tenant ID, Client ID, Client Secret, and Admin Email ID. You can also upload a CSV file containing mailbox addresses for bulk processing, then click Connect & Continue.
step

Step-12

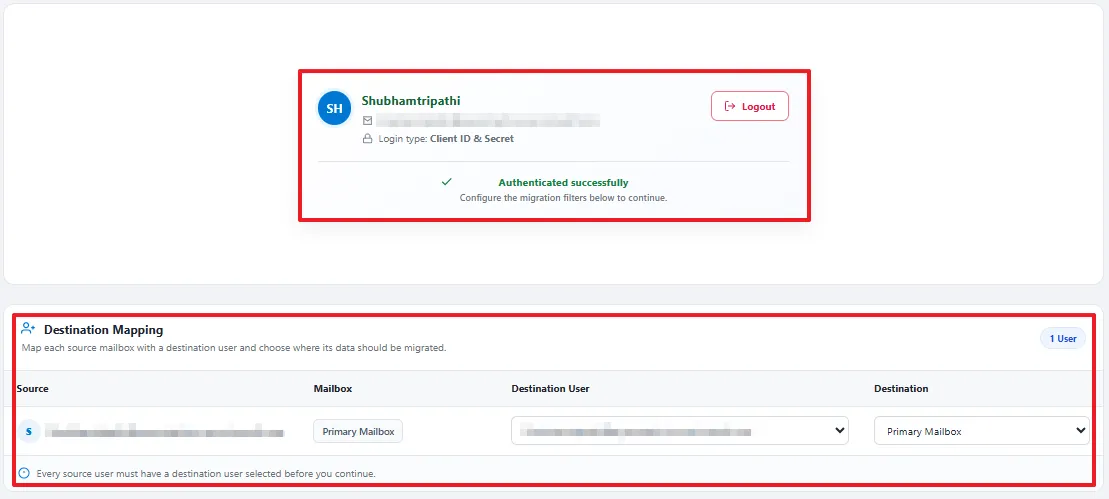
Configure Destination Mapping if Required

Verify the mailbox mapping before proceeding with the backup.
step

Step-13

Apply Backup Filters

Configure the available filters to control which Office 365 mailbox data is transferred to the destination Office 365 account:

  • Remove Duplicates: Identifies duplicate mailbox items and prevents them from being transferred to the destination mailbox.
  • Date Filter: Transfers only the emails and other mailbox items that fall within the selected date range.
  • Skip Migrated: Skips items that were already transferred during an earlier migration to avoid duplicate processing.
  • Free Up Server Space: Removes the selected source mailbox data after successful migration to help reduce storage usage.
  • Custom Folder Name: Lets you assign a preferred name to the destination folder where the migrated data is stored.
  • Exclude Empty Folders: Prevents empty folders from being created in the destination mailbox.

Under Include Items, select the mailbox data you want to migrate:
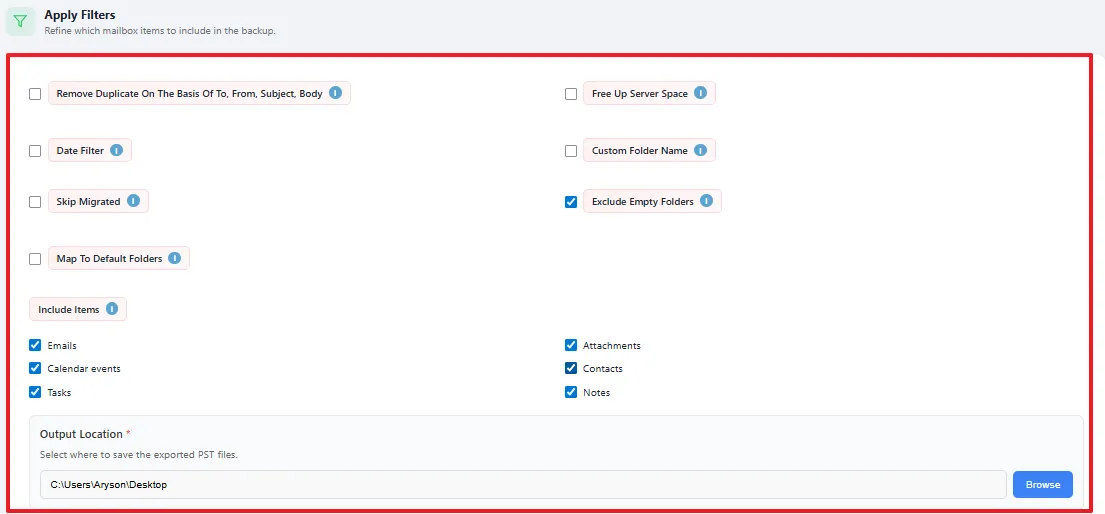
  • Emails: Transfers email messages from the selected source mailboxes to Office 365.
  • Attachments: Migrates email attachments along with their associated messages.
  • Calendar Events: Transfers appointments, meetings, and other calendar entries.
  • Contacts: Migrates saved contacts and their related information.
  • Tasks: Transfers tasks and their associated details.
  • Notes: Migrates notes stored in the source mailbox.
  • Choose the Destination: Select the Office 365 destination mailbox or account where the selected data will be migrated.
step

Step-14

Click Start Migration to begin transferring the selected Office 365 mailbox data to the destination Office 365 account.

step