-
Written By Rohit Singh
-
Updated on June 27th, 2026
How to Migrate Public Folder to Shared Mailbox [Expert Guide]
| User Query: “We recently moved our on-premises Exchange environment to Exchange Online and now want to replace all Public Folders with Shared Mailboxes. Since there’s no direct migration option, we’re looking for the safest way to complete the process with minimal user impact. Is there a reliable manual method or a trusted third-party tool for this migration?” |
Many organisations have already moved from on-premises Exchange to Microsoft 365. After the migration, the next challenge is often dealing with Public Folders. Since Microsoft doesn’t offer a direct way to convert them into Shared Mailboxes, many IT admins are unsure where to begin. If you’re trying to migrate Public Folder to Shared Mailbox, this article explains both the native method & the Cigati Office 365 Backup Tool to help you complete the migration with minimal effort and without risking your data.
Scenarios That Require Migrate Public Folder to Office Shared Mailbox
Organizations prefer to move Public Folders to Shared Mailboxes for the following reasons:
- It is easier to manage Shared Mailbox rather than the traditional public folders.
- They simplify mailbox permissions for multiple users.
- Users can access emails directly from Outlook without browsing complex folder hierarchies.
- Shared Mailboxes integrate better with Microsoft 365 collaboration features.
- Many organizations are modernizing their Exchange environment by replacing legacy Public Folders.
- Shared Mailboxes make email management and administration more efficient.
Proven Methods to Migrate Public Folder to Shared Mailbox
You can transfer Public Folders to a Shared Mailbox either manually or via a professional method. The native method is suitable for smaller migrations, while the automated solution is a better choice for large Public Folders & business environments.
Method 01: Convert Public Folder to Shared Mailbox Manually
If users only need to migrate a small Public Folder, you can use the manual method. Since Microsoft doesn’t provide a direct option to convert a Public Folder into a Shared Mailbox. You’ll first export the Public Folder to a PST file and then import it into a newly created Shared Mailbox.
Step 1: Export the Public Folder to a PST File
- First, open Microsoft Outlook with an account that has access to the Public Folder.
- Afterwards, go to File > Open & Export > Import/Export.
- Now, select Export to a file >> click Next.
- After that, choose Outlook Data File (.pst).
- Now, select the required Public Folder & enable Include subfolders.
- Finally, choose a location to save the PST file and click Finish.
Step 02: Create a Shared Mailbox
- Next, sign in to the Microsoft 365 Admin Center.
- Then, go to Teams & Groups > Shared Mailboxes.
- Afterward, click Add a Shared Mailbox.
- Now, enter the mailbox name & email address.
- Then, click Save.
- Finally, add the required users and assign Full Access permissions.
Step 03: Import the PST into the Shared Mailbox
- Once the mailbox is ready, open Outlook through an account that has Full Access permission to the Shared Mailbox.
- Next, make sure the Shared Mailbox appears in Outlook.
- Then, go to File >> Open & Export >> Import/Export.
- After that, select Import from another program or file.
- Now, choose Outlook Data File (.pst) >> click Next.
- Next, browse to the exported PST file.
- Then, select the Shared Mailbox as the destination.
- Finally, complete the import process & verify that all emails & attachments have been migrated successfully.
Drawback of the Manual Workflow:
- It can’t convert a Public Folder to a Shared Mailbox in one step.
- Large Public Folders usually take longer to move.
- User access needs to be set up again after the migration.
- Big PST files can be hard to import without issues.
- You’ll need to check the migrated data yourself at the end.
Method 02: Expert Solution to Migrate Public Folder to Shared Mailbox
The Cigati Office 365 Backup Tool helps you move Public Folder data to a Shared Mailbox without any manual effort. It can transfer emails, calendars, contacts, notes, & folder structure. You can also use options like date filters, duplicate removal, custom folder names, & user mapping. This makes it easier to handle both small & large Office 365 migrations.
Steps to Move Public Folder to Shared Mailbox:
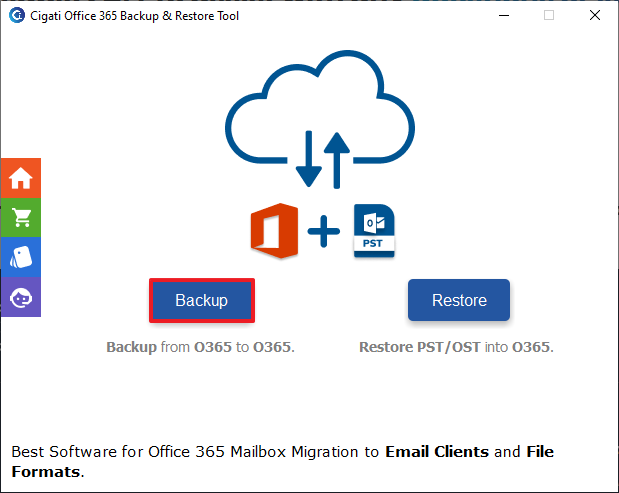
- Install and launch the Office 365 Backup Tool >> click the Backup option.
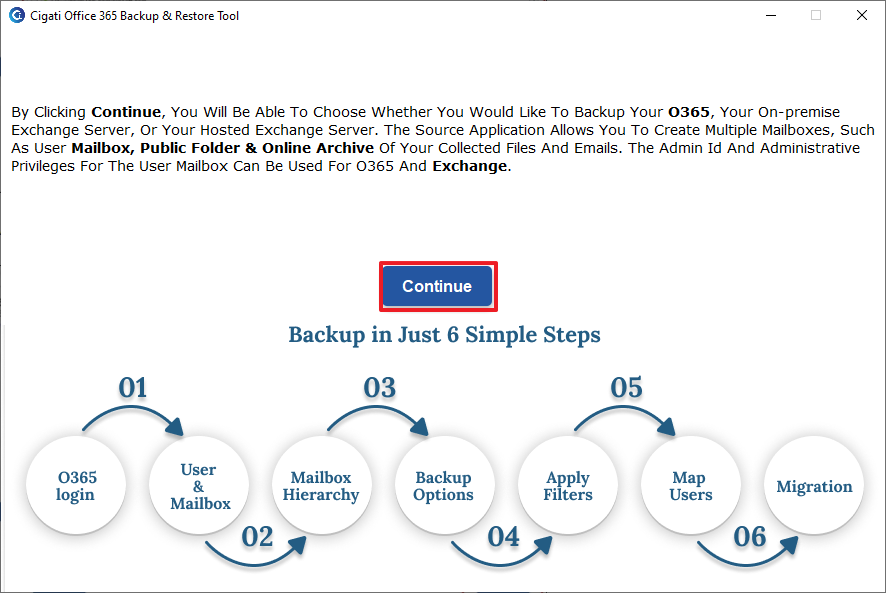
- After that, tap Continue to move ahead.
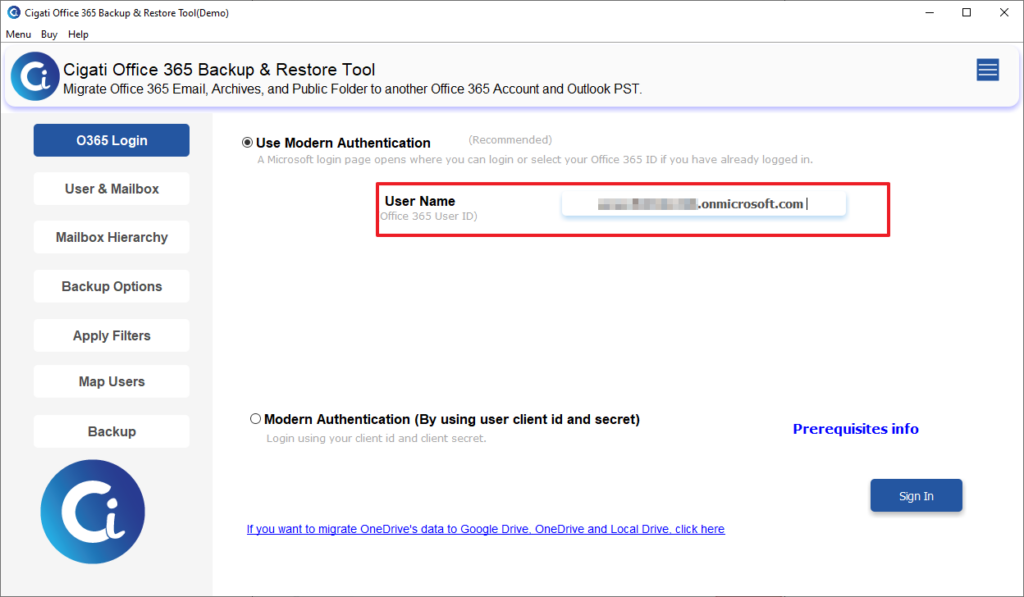
- Sign in via your Microsoft 365 administrator account credentials.
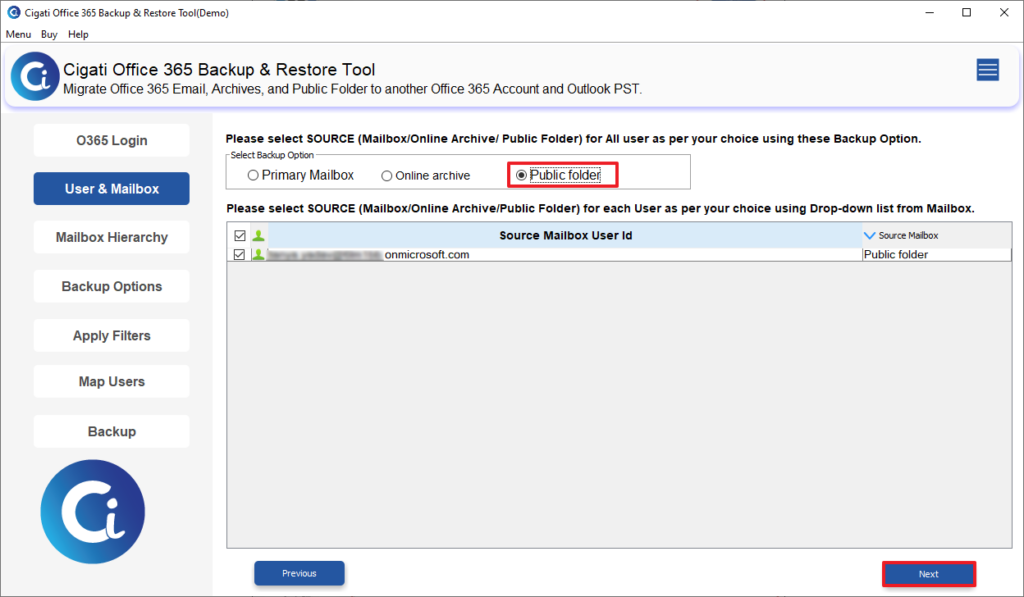
- Choose Public Folder as the source and select the mailbox you want to migrate. Tap Next.
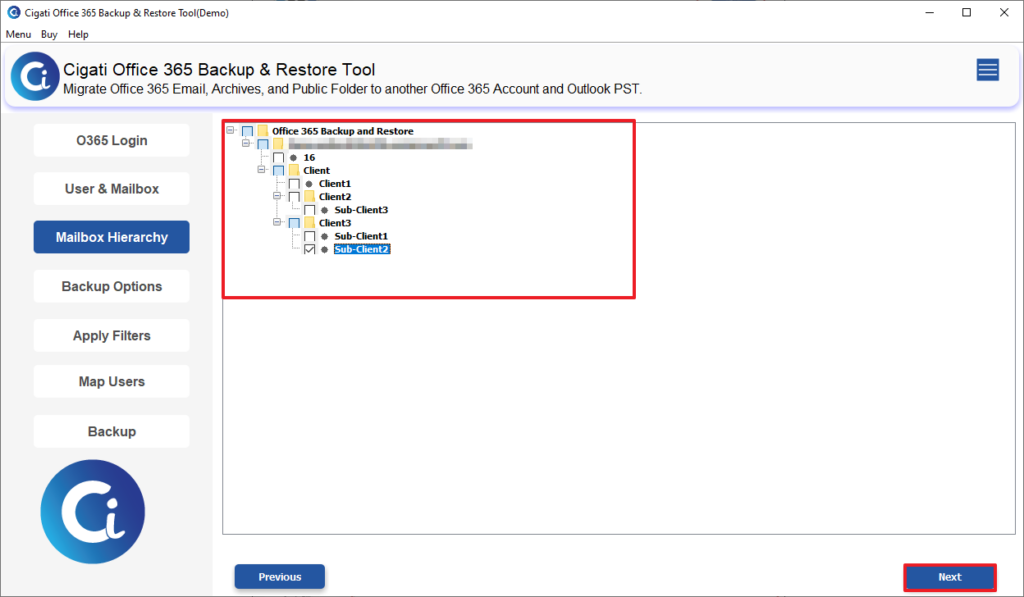
- Select the required Folders from the list. Click Next.
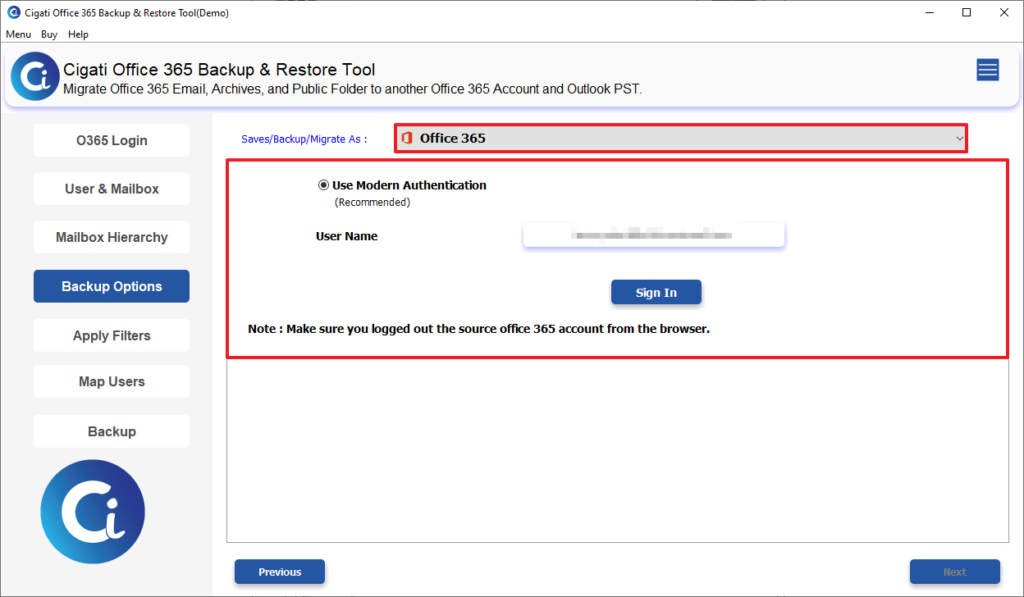
- Under the Save/Backup/Migrate options, choose Office 365 as the destination.
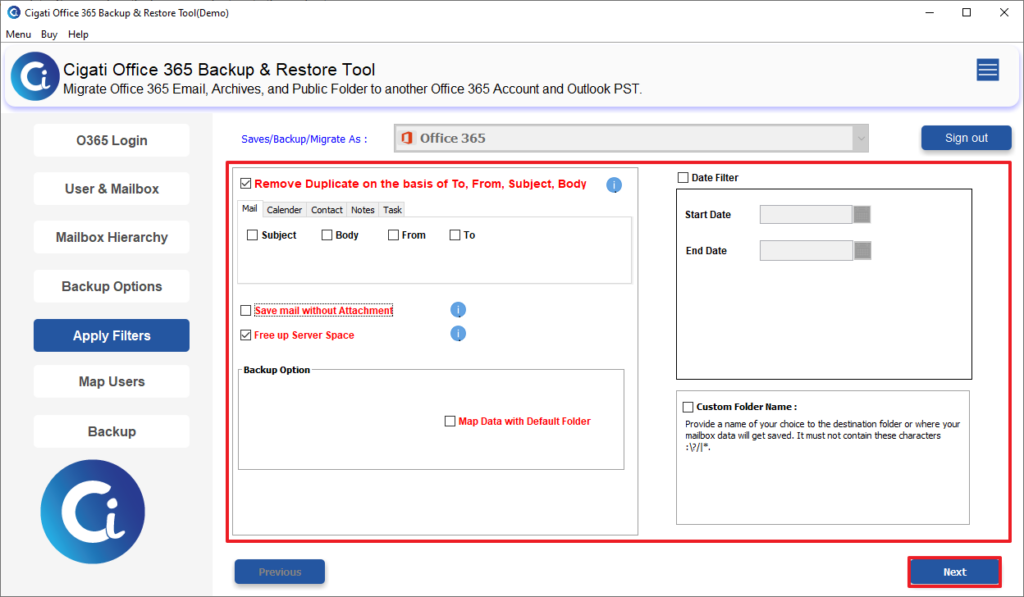
- Then, apply the additional filters >> click Next.
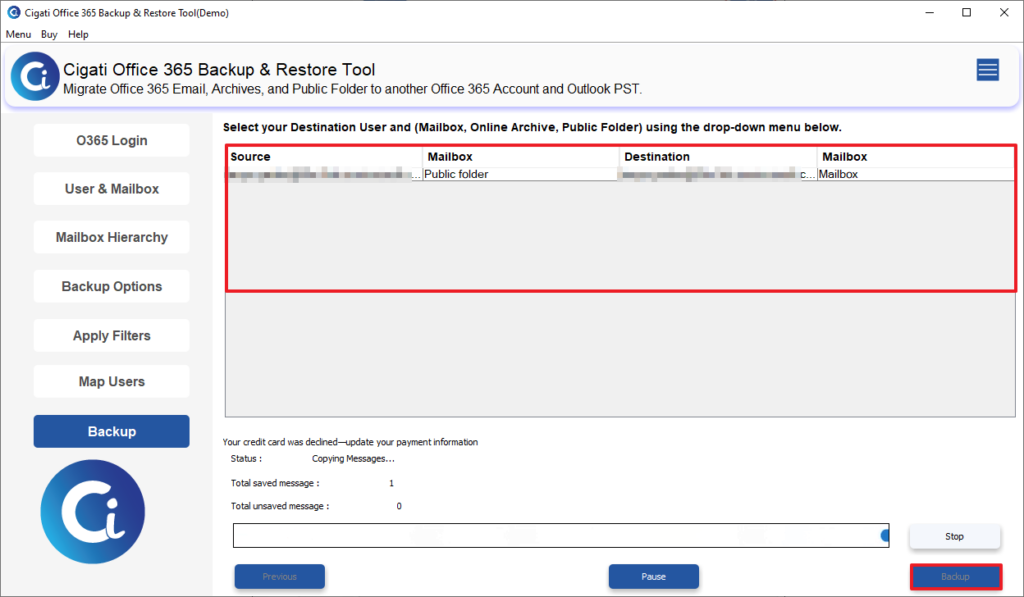
- Map the source Public Folder to the target Shared Mailbox from the user list.
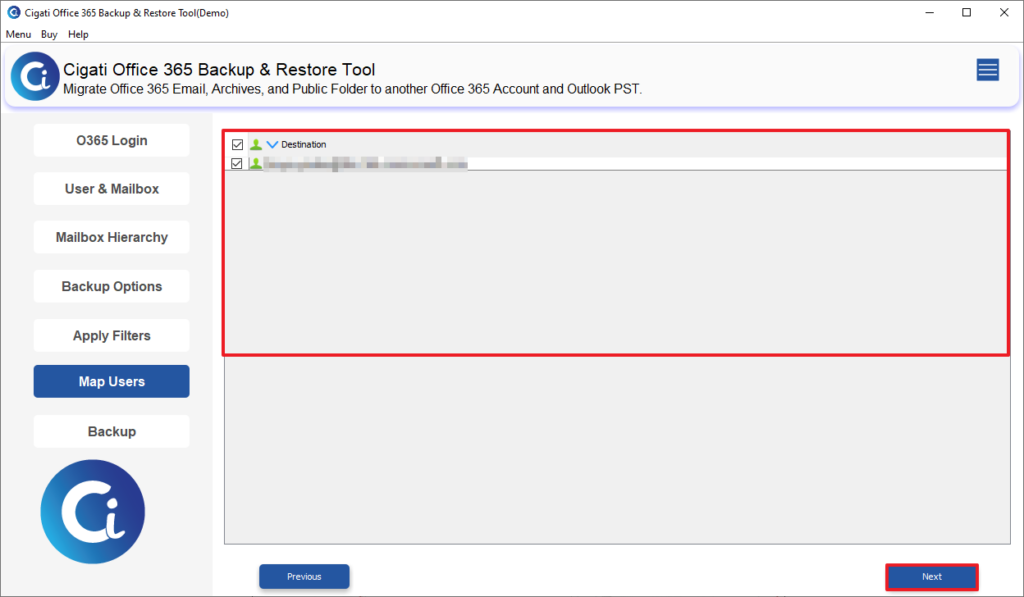
- Lastly, click Backup to begin the migration process.
| Real-Life ScenarioJames Carter manages the IT systems for a consulting firm in the UK. Once the company moved to Microsoft 365, they wanted to shift their Public Folders to Shared Mailboxes. The manual process became difficult because of the large PST files involved. To simplify the process, they used the Cigati Office 365 Backup Tool. It successfully migrated emails, contacts, calendars, and folder structure to Shared Mailboxes while keeping the data intact. |
Final Conclusion
To sum up, the manual method is a good choice when you’re moving only a small Public Folder. However, it requires exporting PST files & setting permissions again. If you need to move more data, the Cigati Office 365 Backup Tool can make the process easier while keeping the folder structure the same.
You May Also Read: Migrate Shared Mailbox to Office 365
Frequently Asked Questions
Q1. What is the easiest way to Migrate Public Folder to Shared Mailbox?
Ans. The easiest way is to use the Cigati Office 365 Backup Tool. It migrates Public Folder data directly to a Shared Mailbox while avoiding the manual PST export and import process.
Q2. Can I migrate multiple Public Folders to Shared Mailboxes at once?
Ans. Yes. The Cigati Office 365 Backup Tool supports batch migration, allowing you to transfer multiple Public Folders to Shared Mailboxes in one operation, saving both time and manual effort.
Q3. Will my folder structure remain unchanged after the migration?
Ans. Yes. The tool keeps the original folder hierarchy, emails, contacts, calendars, and other mailbox items intact, making it easier to access your data after the migration.
Q4. Can I migrate only selected Public Folder data?
Ans. Yes. The tool offers date filters and folder selection options, allowing you to migrate only the required Public Folder data instead of transferring the entire mailbox content.
Q5. How can I avoid duplicate items during the migration?
Ans. The Cigati Office 365 Backup Tool includes a duplicate removal feature that prevents duplicate emails and mailbox items, helping keep the destination Shared Mailbox clean and organized.
Q6. Can I migrate Public Folder emails without attachments?
Ans. Yes. The tool includes a Mail Migration Without Attachment option, which transfers only email messages while excluding attachments, helping reduce migration time and storage requirements.
About The Author:

Rohit Singh is a technology professional with 7+ years of experience specializing in email systems, Exchange Server, Office 365, MS Outlook, and data migration solutions. He creates clear, practical, and solution-oriented content to help users and IT professionals resolve complex technical challenges efficiently.
Related Post